Monday, September 1, 2025

ON OR IN THE WATER

That's the theme this week over at the Shopping Our Stash Weekly Challenge. I was digging through my stash and came across this heat embossed and blended panel left over from a previous experiment long ago. 

For this card, I just overprinted a couple of dolphins from a Hero Arts (#CM317) stamp set. Of course, the heat embossing repelled the ink, making the dolphins look like they're "in the water". I stamped a third one, fussy cut him, and attached him over the waves with tiny pieces of dimensional foam after stamping a tiny sentiment and adding the panel and matting to a white card base. A bit of touch up with a Copic marker and white gel pen was in order. So easy, and one more scrap cleaned out of the stash! 

Also in my stash was a sheet of white wood-grained paper for a custom envelope - I think wood-grain often looks water-like - and scraps of a blue nautical-themed  paper for lining.


Shopping Our Stash Weekly Challenge Blog: SOS555 - On or In The Water


Added 11/08/25:


Sunday, August 31, 2025

ANOTHER DAY, ANOTHER CARD!

I'm playing with challenges again today, and using the layout at Freshly Made Sketches #701 - A sketch by Jen and the colors by Seize the Birthday #312 - Black & White. 


For the layout, I rotated the sketch 90 degrees and used an old PTI birthday die as the columns on the FMS sketch. Starting with a white card base, I attached a die cut stitched rectangular panel. The birthday dies were cut twice and layered in black, silver, and gray card stock and attached to the face. The final "greetings" sentiment was heat embossed in silver, cut in a strip, and attached with black dimensional foam to stand out from the face a bit.


Freshly Made Sketches: Freshly Made Sketches #701 - A Sketch by Jen B


Seize the Birthday: Seize the Birthday #312-Black and White


Added 9/12/25:


Saturday, August 30, 2025

2ND POST OF THE DAY!

Well, this was fun - I think I'm on a roll! This time I'm inspired by two challenges -  Color Throwdown #839 and Inkspirational Challenge #349 - "Add a Tag".

The colors for Color Throwdown are obviously aqua, red, and white! I did add a tiny bit of silver on the sentiment and the center of the poinsettia. The tags are really old dies and I don't remember who manufactured them. I stacked two shapes together, punched a hole in the top, and tied some aqua bakers twine through the hole. I attached the tags to the face of a white card base that I had silver heat-embossed with a sentiment - I glued dimensional foam to the back of the tags so that I could slip small die cut leaves behind. The foliage and floral dies are from Spellbinders "Christmas Blooms". I believe I purchased these sometime last year, but I don't think I've used all of the images before.


Links to the two challenges:


Color Throwdown: Color Throwdown Countdown #839


Inkspirational: Inkspirational Challenge #349 - Designer's Choice - Add A Tag


Added 9/20/25:


HAVE YOURSELF A MERRY LITTLE CHRISTMAS

I've been pretty much MIA for the past couple of weeks. It's been crazy busy, with the ending of summer and the beginning of the school year. My husband teaches at a local private college prep high school - he's going into his 40th year at the school and he'll be retiring at the end of this school year, in June 2026. It feels like this summer has been socially busier than in the past and we've also been working in the garden and preparing for retirement. I'm hoping things will return to some sort of normalcy after this long holiday weekend. It was great to take my coffee into the craft room/office and actually work on a fun challenge. 

I'm slipping in to the end of the August Peace on Earth Challenge #94. Each of the quadrants of the ladies' inspiration board features Christmas sheet music and that caught my eye.


I remembered that I had this old PTI "Songbirds" stamp and die set that I haven't used for quite some time, and that seemed appropriate as I play with a new-to-me Tim Holtz die set (#666715 "Vault Festive Wreath"). I wanted this card to have an old-fashioned and textural look to it and used some pieces of kraft wood-textured card stock for the background and wreath base. Rather that use bright green foliage, I opted for some green stripe printed stock. The candles and banner are die cut from heavy ivory watercolor paper scraps. 


Here's the great inspiration board:


Friday, August 15, 2025

HAPPY HALLOWEEN - EEEK!!

Hello, all of you ghoul lovers! This is our reminder that we still have 2 weeks left on our current August Two Old Bats Halloween Challenge. 


For this card, I had some bits and pieces from a previous attempt that I never used and they've been languishing in my stash for a couple of years. I love it when I can use up old scraps and reorganize them! I started with a printed image that I had fussy-cut from some really old printed cardstock. It seemed appropriate for this month's challenge, although it is a bit creepier than the skull and flowers our leaders have included in the mood board.  I thought it would be fun to stamp the sentiment onto a band of red-orange paper and thread it through the eye socket - YUCK, creepy! I prepared a side-folded pale gray card base and then picked up some of the colors of the bird/skull image - mauve textured die cut stitched rectangle, aubergine die-cut filigree frame, and red-orange mat. The skull, raven, and sentiment were attached to the card front with dimensional foam.    


We're still hoping to get 25+ challenge entries so the ladies can have a drawing for these Whimsy Stamps alien dies, and the last time I checked it seemed quite possible:


Monday, August 11, 2025

DONNA'S BIRTHDAY

We're sitting here in record-breaking heat today - 107 degrees F yesterday and expecting the same for the next couple of days. I worry about our feral cats, but they always seem to manage to survive. I'll make sure they have plenty of cool water on the covered patio.

Today is my friend Donna's birthday, and for inspiration I went to a couple of challenges:  AAA Cards Challenge Game #296 "Sketch" and Tic, Tac Toe Challenge #276.

I started this card with a white A2 card base. I die cut an oval out of a piece of tissue to provide a mask and taped it to the front of the card, stamping the Hero Arts sun image in black. Using my Copic markers, I colored the sun and sky. The PTI sentiment was over-stamped and black heat embossed. That's it! I'll just lay low for the rest of the day and stay inside.

Here are the challenges:

   AAA Cards: AAA Card Challenge #296: Sketch Challenge  


Added August 24, 2025:


For this challenge, my card will fit into a couple of these rows - right down, CAS/Sentiment/Embossing and middle down, Summer/Free/Single Layer.

TTTC276- Featured Designer Design Team X - Tic Tac Toe Challenge


Friday, August 1, 2025

AUGUST TWO OLD BATS HALLOWEEN CHALLENGE

It's always hot here in southern Oregon in August, so it's a good time to stay inside and make more Halloween cards. Our two favorite 'old bats' have provided some cute images this month to give us a kick-start. Of course you're not required to use the mood board, but I generally like using it for at least one of my cards each month. Let's see what you come up with:

Two Old Bats Halloween Challenge: August 2025 Anything Goes Halloween 


I was drawn to the haunted house in the lower left corner and loved all of the green, pink, and purple tones. 

My card has so many layers - I started with a green card base and a matching panel from the same card stock. I stamped a Newton's Nook tree, a couple of Tim Holtz bats, and the sentiment with black ink on the green panel. Then I started layering moon, die-cut stitched clouds, and foreground, continuing to over-stamp the tree and bats with black ink. Once all of these layers were completed, I trimmed the panel with a stitched rectangular die, matted it with black cardstock, and mounted all of the layers to the face of the card base.

The haunted house (Tim Holtz) was die cut from some aubergine card stock and backed with a scrap of bright pink paper that I stamped a couple of partying zombies on in purple. My last step was to fussy cut a couple of tiny ghosts to join the zombie party.

If you've come here first, go over to the TOB blog and see the wonderful cards our Design Team is offering up for your inspiration. 

AND...we still have these cute alien dies from Whimsy Stamps to give out if we reach 25 entries:


Saturday, July 26, 2025

LATE GRAD CARDS

I honestly don't know where my time goes anymore, but many events have been slipping past me without acknowledgement. Last month it was graduation cards. I had two important graduations in June that I have basically missed - both for grandchildren of my brothers. I guess that would be grandnephews.

With both of these young men, I cut up their graduation invitations to personalize their cards. I don't know if they'll really appreciate this! 


Card #1 is for my late oldest brother's grandson Broderick. I trimmed the inside panel of a printed image of his high school with a stitched rectangular die and die cut the year with large PTI numbers. I stacked 3 layers of white numbers with the ones die cut from the image and then overlaid them with a die cut "Congrats" (Hero Arts #DC274) from gold metallic cardstock and attached it over the numbers with some gold stars and matted that with red cardstock (school colors) and attached it to a white card base. I haven't finished with the inside yet because I want to attach a die cut gift card envelope and I loaned my die to a friend. 


Can I brag on this young man for a minute? He was offered the Presidential Scholarship at Willamette University, a prestigious private college here in Oregon. The announcement came in the form of a Willamette University scarf  and accompanying letter impressively packaged:


______________________________________________________________________


Card #2 is for my youngest brother's grandson Scott. He lives in Kentucky and I cut up one of his graduation photos with a star Die from PTI. I mounted it onto a larger metallic silver die cut star from the same set. The background die and balloons are from an older PTI "Birthday Bash" set. I die-cut the balloons from iridescent cardstock. The front panel was matted with metallic silver cardstock and attached to a turquoise card base. I heat embossed the "Congrats" onto dark blue cardstock, fussy cut around the letters and layered balloons, star, and sentiment to the die cut background. Again, waiting for my gift envelope die to finish up the inside.

I'll have to make sure the inside gift cards are generous so they'll overlook the lateness!     

Tuesday, July 15, 2025

JULY MID-MONTH TWO OLD BATS REMINDER

Here we are half-way through our July Halloween challenge and this is a reminder that there's still plenty of time to enter your projects. And remember that your project can be "anything Halloween" - our mood board is for inspiration that you can follow - or not.


My project is a completely different direction from the mood board, although I guess one could say that the colors and tone of the card is similar to the lower left quadrant.

I've had a black filigree die cut frame hanging out in my Halloween stash for a couple of years and was determined to use it finally, although I wasn't sure where I was going to go with it. I ended up making a card from a scrap of two-sided printed spider web stock and attaching the frame at an angle. I glued a rectangle of some bat printed paper to the frame - these papers are from a 12x12 stack from Park Lane ("Haunted Hollow") with lots of somber-toned prints that are a bit on the ghoulish side, but I love them! The front of the card seemed like it needed more than just a framed panel with bats, so I decided to add a torn vellum strip that I white heat-embossed the sentiment on, attached it, and added a mauve twine tie and black die cut bat. The custom envelope is also from the same paper stack.     


To make the treat box, I used the same materials. I didn't have mauve twine, so I made it by passing a length of off-white twine under the wide end of a BV23 "Grayish Lavender" Copic marker.


Friday, July 11, 2025

TIME TO KICK BACK!

Ah, summer! I've been thinking about vacation and next week we will be headed to the central Oregon coast for a 5-day respite, so I was inspired by ideas at two of my regular challenges: Tic Tac Toe and The Paper Players. Each of them had elements for me to borrow for this card.


I started this card by making a card base from an old sheet of  bright blue water printed card stock with glitzy bubbles printed along one side. I left off the bubbles for the card base but used them for a smaller die cut rectangular panel that I matted with yellow and white papers before attaching the layers to the face of the card. I white heat-embossed the sentiment and then constructed a summery cocktail from Tim Holtz's "Happy Hour" die set. I struggled to make a glass with vellum (because I wanted it to be transparent) and ended up using two layers of vellum, inserting the drink and accompaniments between the layers. I don't think it was totally successful, but I'm sharing it anyway!


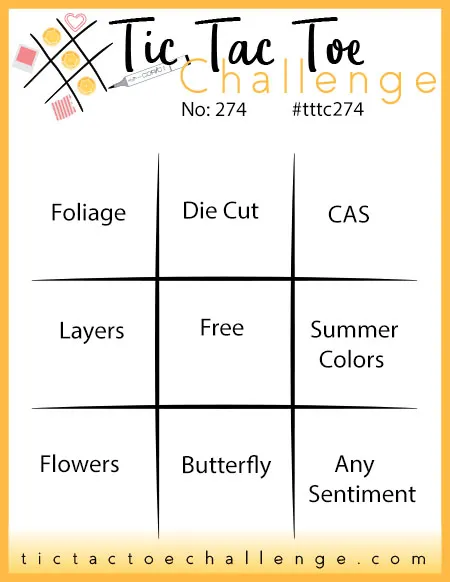
The center row across - Layers/Free/Summer Colors:

TTTC274 - Featured Designer Design Team X - Tic Tac Toe Challenge


Paper printed with circles, as well as a slice of lemon:


Sunday, July 6, 2025

BIRTHDAY WISHES

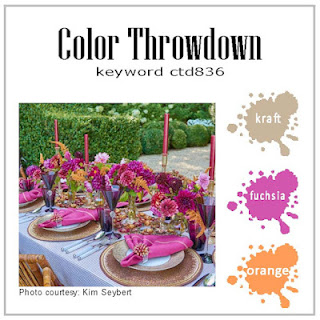
I'm in need of a couple of birthday cards this week and decided to make two at the same time to save myself some grief. I was inspired by Color Throwdown Challenge #823 - kraft, fuscia, and orange. I made an A2 card base and matching envelope from some kraft paper I had in my stash.


I'm fond of the spotlight technique and stamped the Hampton Art #SC1013 flower-filled envelope with black ink twice - once on the face of the card and the second time on an extra scrap. I colored the scrap with markers, cut the image out with stitched die, and attached it over the uncolored image. the final step was to white heat emboss a PTI sentiment on a strip of black cardstock and glue it to the face. 


I finished the inside off with a small portion of the same image in black, die cut it with a rectangular stitched die, matted it with black cardstock, and attached it to the inside where I'll hand write a message, I lined the matching envelope with some fuscia-colored printed paper.


Color Throwdown: Color Throwdown Challenge #836


Saturday, July 5, 2025

OUR BIRTHDAY BOY

Our grandson hits the magic age of 16 in September and he'll be down to the DMV at 8:00 AM to take his driver's license test, and of course he'll pass. His dad has an older model silver-toned pickup truck that will become his "new" wheels. As far as his parents are concerned, it can't come a moment too soon because they're sick of running him, his twin sister, and younger sister back and forth between school and soccer practice. So, you can guess where I was going with this birthday card!


I started with a bunch of coordinating soccer papers by Authentique that I purchased last year before his 15th birthday. The pickup die set is new to me from Whimsy Stamps ("Truck Die Set" #WSD122) and I die cut the pieces from dull silver vellum and added bright silver accents, which don't show up very well with this photo. I got the idea that I wanted to cut an opening through the card base and background soccer field and slip a black and white photo of him inside the truck. Of course, he's hauling soccer balls and die cut numbers (PTI).

When the card is opened, there's his photo and die-cut sentiment (PTI) with more of the coordinating papers. I found a sheet of paper that's printed grass to use as lining in the black square envelope.


There are a couple of challenges I wanted to share this with:

NBUS because of the brand new truck die:


And the Pretty Papers challenge. I'm not sure how "pretty" these papers are, but they are definitely coordinated:


Tuesday, July 1, 2025

JULY TWO OLD BATS HALLOWEEN CHALLENGE

Here we are in July and our favorite Ghoul Friends have a new inspiration board for us at Two Old Bats Halloween Challenge - actually, you're not required to use the board. It's there for your inspiration, but I usually like using it to get myself jump-started.
 
I think you can see from my card that I definitely went with the lower right quadrant of the board! 


I die cut a deckled rectangle out of gray cardstock and then started assembling the scene with a variety of manufacturers' products. Using black ink from Memento I stamped a grassy knoll from Whimsy Stamps "Zombie Party" and a leafless tree from Newton's Nook "Spooky Street". I overlaid a moon that I had created from Tim Holtz's "Halftone Halloween" by stamping with grayish tones on  tan cardstock and then blending and die cutting it with circle die. I glued it to the face of the gray deckled rectangle and stamped the tree again. The bat is from Newton's Nook "Spooky Street" and the cat and pumpkin are from Unity "Toil and Trouble" - I stamped and colored them, fussy-cut them, and attached them to the face of the card with black dimensional foam. Finally, I attached all of this to a black card base and created a coordinating envelope, adding a sentiment and cat from LDRS Creative "Wicked" to the flap.  


It's now your turn! If we get to 25 entries the ladies can finally reward someone with the alien dies from Whimsy Stamps that have been hanging about for months!

And as long as we're on the subject of cats: Here are Tux and Tiger. Would you believe that these two boys were litter mates? It's hard to believe as they are so different - born to Chloe our calico a couple of years ago.