Friday, March 15, 2024

MID-MARCH REMINDER - TWO OLD BATS HALLOWEEN CHALLENGE

It's mid-March and it's a perfect night for Two Bats Halloween Challenge! My cell phone camera didn't like the bright green I used on this card and to line the envelope - they came through decidedly yellow. 


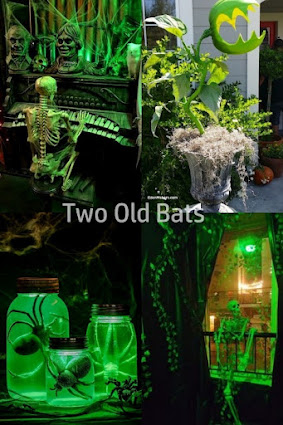
This time around I was inspired by the lower right quadrant of the mood board - a skeleton and some drippy branches. Using some laurel branches upside down from an IndigoBlu rubber stamp set ("Laurel Leaves" designed by Kay Hallowell-Sutton), I heat embossed with Zing! "Leaf" onto a stitched rectangular panel of black card stock. Then I white heat-embossed a very old sentiment. The skeleton is an old friend I've used many times. I stamped him on white card stock and fussy cut him, adding some green Copic markings for reflection on his old bones. I heat embossed an additional spray of leaves on black and cut it out to add to his hand with a bit of black dimensional foam. All of this got attached to a black card base.  


Time for you to get out your green supplies and make a March Halloween project - although it really doesn't have to be green. Diane's moodboard is for inspiration, and you can use it or not. I personally am fond of this month's board because there's so much there to play with!

HOME SWEET HOME

Today looks like the first day of spring - the sky is absolutely clear and the plum tree blossoms are ready to pop! I haven't worked in my craft room for more than a week. I looked in on Tic Tac Toe Challenge #243 and see a perfect opportunity for a bright spring-like card! I decided on the center down choices - Yellow/CAS Design/Pearls or Sequins.

This is also a new design for my son's real estate business - he gives out my handmade cards to his clients when they close on their new homes. I've spoken about this previously here and here

This card started as a white 5-1/2" square card base. I trimmed a piece of yellow cardstock down to 5x5 and die cut a square out of the center. The sentiment is from a small Hero Arts stamp set #DC225 and I stamped it with Memento "Tuxedo Black before attaching the yellow square to the face of the card. Then I die cut Birch Press Design's "Honeycomb Mini Tile Later Set" #56125 from several yellow and ochre scraps, glued them together, and centered them in the opening of the yellow square. The final step was to stamp, color, and fussy cut a bee from Hackney & Co. "Tell the Bees" set and mount her to the card with a bit of dimensional tape. I dug through all of my stash and found three honey-colored sequins to complete the challenge.

The coordinating envelope is from a pack of square vellum envelopes I picked up a couple of months ago at Michael's. I decided to line it with some bee printed paper I have in my New Home stash. 

I realize that everything on this card - the honeycomb die, the sentiment, and the queen bee are all elements that I've never used before, so I hear NBUS Challenge #60 beckoning to me!   


TTTC243 - Featured Designer Silke - Tic Tac Toe Challenge  


Friday, March 8, 2024

MASCULINE BIRTHDAY

I've been fascinated by cards I've seen on Pinterest that look like a man's suit or shirt and thought to attempt one myself for a dapper friend of mine who's having his birthday today. I really had no idea where I was going when I first started, other than that I wanted to have a pocket to slip a tag into that resembled a handkerchief.


I started with a black 5x7 piece of cardstock for a base to attach all of the other elements. It took me hours to make this and I really don't know how to describe the whole process, other than to say it was a complicated series of trials and errors! I found this black embossed paper in my stash that seemed like it would make a perfect jacket and I started with the collar by folding a strip of beige cardstock and attached it to the top of the black panel, overlapping it slightly above the panel and a bit off-center so that I would have space on the right side for a pocket. I added a piece of beige below for the rest of the shirt. Then I constructed a tie by folding a striped printed paper into roughly the shape of a tie with a Windsor knot and gluing it to the card base under the collar. The next step took the longest because I had to figure out just how to make the lapels. I attached the left side first, gluing it to the card base and trimming the edges. The right side was more complex because I had to construct a pocket by slitting a line across the jacket front and adding a pocket behind it before I attached it to the right side of the card and trimmed it. I cut a strip of paper and die cut some stitching on two edges before attaching it to the jacket front. The final step was to make a button from solid black cardstock and pull some thread through the buttonholes and attach.   


WHEW! As I said, it was a complicated procedure - similar to a tailoring class I once took! The "handkerchief" is a tag cut from a coordinating printed stock with a beige square attached and black heat embossed sentiment. Before slipping the tag into the pocket, I tied on a strip of black silk ribbon.

I'm really proud of this card, so if Alex doesn't make a big deal out of it, I'll be very disappointed!
 

Monday, March 4, 2024

ST. PATTY'S DAY

As I write this on Monday morning, it's been snowing off and on since Friday night/Sunday morning - just as it was starting to seem like spring was around the corner. I pretty much stayed in all weekend and worked in my craft room. One of the results is this card that hits a couple of challenges -  Shopping Our Stash #SOS516 - "It's Not Easy Being Green" and NBUS #60 (Never-Before-Used-Schtuff). This is the very beginning of thinking about St. Patrick's Day cards. I'm not sure I'll put in the effort this year - we'll see. At the very least, I'll make cards for the immediate family.

I picked up this little dragon a couple of years ago and this is the first time I've used him. He's from Whimsy Stamps ("Bart on St. Paddy's Day" #C1106). I stamped him with black onto white cardstock, colored him with Copic markers, and fussy cut him. I colored an additional shamrock and glued it over the top of the others for dimension. I know I wanted to use this ancient sentiment in my 3/17 stash and I white heat embossed it onto a scrap of green cardstock. Then I just played with both images for a while until I hit on the idea that Bart and the sentiment would work best in this case on a square card. So I prepared a 5-1/2" square card base and added two additional square panels. Rifling through my dies, I came across a filigree-edged rectangle that I've never used (I have used a smaller version of this rectangle, but not this particular one). I trimmed the sentiment and attached it to the die cut rectangle as a frame and attached them to the card front. I attached Bart with some dimensional foam, overlapping the sentiment. That's it! I found the bright green square envelope in with my St. Patty's Day papers.  


Shopping Our Stash Weekly Challenge Blog: SOS516 - It's Not Easy Being Green


Friday, March 1, 2024

MARCH TWO OLD BATS HALLOWEEN CHALLENGE - EEK!

The beginning of March (how did we get here so fast?), and it's a new Two Old Bats Halloween Challenge! I love this month's green mood board - lots of inspiration for you! I went with a combination of the upper right and lower left quadrants for this card - a Venus flytrap in a jar of spiders. My Venus flytrap is eating a spider right out of her web!


You can see from this photo that I started with a stamp from Whimsey Stamps with a jar of eyeballs and other stuff. I stamped it with black on white cardstock, colored it with Copic markers, and added spiders, and fussy cut it, excluding the skull and pumpkin. I white heat embossed a spider web  and "EEKs" onto a stitched panel of gray printed card stock and glued the jar and some additional fussy cut poison jars to it. I then set about creating a Venus flytrap by drawing and coloring and cutting out and gluing to the top of one of the stems. I also added some die cut PTI leaves and a fussy-cut spider. This I mounted to a bright green polka dot panel that I border punched with drips. It was a fairly complex process, but it was fun! 

Here's a closer look at the images: 


It's now your turn with this fabulous mood board! If you can't find enough inspiration here, not to worry because you can enter any Halloween project. Check out the great cards the Design Team is sharing.


BIRTHDAY FISHES . . .

. . . FOR MY FAVORITE PISCES!

My brother's 76th birthday has caught me a bit off-guard this year - I've been really busy planning a surprise 40th birthday for the guy who runs the non-profit organization where I volunteer weekly. His birthday is the 8th and my brother's is the 7th. So I decided to cheat a bit by restyling an old card from July of last year. I've had this card from a previous challenge and I thought to CASE my own card, but laziness got the best of me!  I just added a new sentiment over the old one. Is it cheating to offer up an old card with a new sentiment at the current AAA Cards Challenge #259 CAS "Anything Goes - Optional Twist Birthday"? I guess I'll find out!


The new sentiment is a Penny Black set - #30-846 "Birthday Fishes". I white heat embossed it on black card stock, trimmed it, and rounded two of the corners with a Fiskars quarter-round punch. I attached it to the card with black dimensional foam. The original top-half description is HERE. The custom envelope is stamped with a silly rubber stamp "Sealed with a Fish" 

So, we'll see if AAA will accept my cheatin' card!