Showing posts with label Christmas. Show all posts

Saturday, August 30, 2025

2ND POST OF THE DAY!

Well, this was fun - I think I'm on a roll! This time I'm inspired by two challenges -  Color Throwdown #839 and Inkspirational Challenge #349 - "Add a Tag".

The colors for Color Throwdown are obviously aqua, red, and white! I did add a tiny bit of silver on the sentiment and the center of the poinsettia. The tags are really old dies and I don't remember who manufactured them. I stacked two shapes together, punched a hole in the top, and tied some aqua bakers twine through the hole. I attached the tags to the face of a white card base that I had silver heat-embossed with a sentiment - I glued dimensional foam to the back of the tags so that I could slip small die cut leaves behind. The foliage and floral dies are from Spellbinders "Christmas Blooms". I believe I purchased these sometime last year, but I don't think I've used all of the images before.


Links to the two challenges:


Color Throwdown: Color Throwdown Countdown #839


Inkspirational: Inkspirational Challenge #349 - Designer's Choice - Add A Tag


HAVE YOURSELF A MERRY LITTLE CHRISTMAS

I've been pretty much MIA for the past couple of weeks. It's been crazy busy, with the ending of summer and the beginning of the school year. My husband teaches at a local private college prep high school - he's going into his 40th year at the school and he'll be retiring at the end of this school year, in June 2026. It feels like this summer has been socially busier than in the past and we've also been working in the garden and preparing for retirement. I'm hoping things will return to some sort of normalcy after this long holiday weekend. It was great to take my coffee into the craft room/office and actually work on a fun challenge. 

I'm slipping in to the end of the August Peace on Earth Challenge #94. Each of the quadrants of the ladies' inspiration board features Christmas sheet music and that caught my eye.


I remembered that I had this old PTI "Songbirds" stamp and die set that I haven't used for quite some time, and that seemed appropriate as I play with a new-to-me Tim Holtz die set (#666715 "Vault Festive Wreath"). I wanted this card to have an old-fashioned and textural look to it and used some pieces of kraft wood-textured card stock for the background and wreath base. Rather that use bright green foliage, I opted for some green stripe printed stock. The candles and banner are die cut from heavy ivory watercolor paper scraps. 


Here's the great inspiration board:


Tuesday, July 1, 2025

CHRISTMAS IN JULY

It's a very hot day today on this 1st day of July - what better thing to do than to hide myself away in my office/craft room and make a Christmas card? My inspiration today was over at Peace on Earth Christmas Challenge #90, where I was interested in the tall green and turquoise trees on the Christmas shelf at the right top quadrant. 


I had this partially made piece of a card from a couple of years ago - see the original here. I trimmed it down from a slimline size to fit on a standard A2 card base, matted it with a slightly larger white die cut rectangle, and added 3 miniature trees and a shooting star from Alexandra Renke's "Winter Village" die set. The trees and star were die cut from glitter cardstock.

Monday, March 31, 2025

THE MOST WONDERFUL TIME OF THE YEAR

I wanted to pop over to Peace on Earth Christmas Challenge #84 before it closes for the month. It's full of Christmas gnomes - while I'm not a huge gnome fan, I do have this cute paper I bought last year (after promising myself not to buy any more Christmas paper until I made a serious dent in what I already have) and it has gnomes, pick-ups, and trees!


I started with a square aqua card base and die cut a square from the red side of the paper and matted it with the aqua side and white. I white heat-embossed the sentiment (Impression Obsession #CL971 "Holiday Words") and added some heat-embossed snow flurries from Tim Holtz. I die cut a small rectangle from the aqua side of the paper, capturing one of the trucks with a tree on top and attached it to the red square. All of the layers were glued to the card base and I lined an aqua envelope with the red HO HO HO printed side of the paper. 


Peace On Earth Christmas : Peace on Earth Challenge #84


Tuesday, March 4, 2025

NO PEEKING

When I saw the new challenge at Peace on Earth Christmas March Challenge #83, I loved the green and ivory gifts in the lower left quadrant and knew I wanted to wrap some Christmas packages to place under the tree.

I still have quite a few sheets of this old BasicGrey "Jovial" printed paper that I promise myself ever year to use up, but somehow it doesn't happen. To give you an idea about how long I've had it in my stash, the lower edge of it is dated 2010! I think the best solution, as I did here with this card, is to also make a coordinating envelope. 

I used a black 5-1/2" square top-folded card base and glued on a 5" square of the printed paper. I cut a square of ivory heavy textured watercolor paper, using the deckled edge for the bottom of the top panel. I die cut one of Tim Holtz's trees from the same ivory stock and glued it to the face of the top panel after stamping the sentiment with PTI "Ripe Avocado" ink. I glued the top panel to the card face and added the packages that I had fussy cut from the printed paper, using some dimensional foam with the the top package layers for some dimension. For the final "wrap-up", I added some avocado twine to the top edge of the card, which also serves to hold a folded vellum page inside the card. 


Peace On Earth Christmas : March 2025 Peace On Earth Challenge #83


Saturday, February 8, 2025

MORE SPARKLE, LESS STRESS

There's still lots of snow on the ground, so it seemed appropriate to do a snowy Christmas card today. I've been planning to participate with the ladies at Peace on Earth Christmas because they have a new inspiration board up. The stag in the top left quadrant with his antlers completely decorated gave me a chuckle, so that's where I went!

Here's what went through my head as I worked on this card: "Norman loved decorating for Christmas so much that his forest friends just didn't have the heart to tell him that he was over-dressed for the annual winter party."


I started with my favorite deer die (from My Favorite Things), and I die cut him and his antlers from two different colors of kraft card stock. I mooshed some brown ink on him and touched him up with white gel and black ink pens. I die cut part of the metal plate from PTI's "Birthday Bash" and attached it to a side-folded card base. I wanted some sparkle in the sky, so I cut a small portion of the same die out of my very last scrap of white sparkle card stock, popped out some of the circles and stars, and glued them into the openings in the top panel. I stamped the sentiment (Unity "More Sparkle, Less Stress"), heat embossed it with Red Tinsel embossing powder, and die cut the top with a stitched wave, and mounted it over the lower front of the card. I attached my little deer to the card and then had loads of fun searching out sparkly red and green card stock scraps for the foliage and cardinal he wanted in his antlers - plus an additional bough to chew on! After decorating his antlers, I added a couple of gemstones for some additional shine in the sky.


The sparkle of the sentiment doesn't show up very well - here's a closer look. And to see the green and red glitter card stock of his antler decorations, here's another close-up.


Here's the link to the challenge. (I always do a bit of a double-take when I see this referred to as the POE challenge - Poe was my maiden name!)

Peace On Earth Christmas : February 2025 Peace On Earth Challenge #81


Added February 15, 2025:


Friday, January 24, 2025

DECK THE HALLS

When I saw the current inspiration board over at Peace on Earth Christmas Challenge I knew I had to play along! All of these photos are beautiful, and I was particularly taken by the warm gray and silver/bronzy tones. 

 Peace On Earth Christmas : Peace on Earth Challenge #80


I chose to work with an old often-used die set from Penny Black (#51-561 "Snowflake Tag"), using it as a tree decoration. This card was made 100% from scraps and odds & ends. It's too bad that Diane and Darlene's newest challenge - The Neglected Stuff Challenge isn't due up until February 4th!


A couple of non-traditional materials included in the making of this card are the background metallic bronze paper - a paint draw-down (interior design parlance for submittals that a painter is required to provide for approval before proceeding with painting a space) and the middle snowflake piece is die cut from a sample of commercial vinyl wall covering. These are the types of things that end up in an interior designer's stash and linger there for years. 


I also used the very last sheet of one of the PTI small "Soft Stone" printed papers to make  my coordinating envelope (I used the printed side of the paper for the inside of the envelope) and a scrap for the top snowflake layer. Even the piece of iridescent satin ribbon was at the bottom of my ribbon scrap basket. The silver-embossed sentiment is from Hero Arts.  

Sunday, December 15, 2024

BEAR-Y CHRISTMAS!

This is the next card made with the small images from my Hero Arts #CM386 "From the Vault - Winter Joy" stamp set. I still have one more image left, but I'm running out of time! I'm sharing this with the current Peace on Earth Anything Christmas Challenge.


I was really pleased with this card until I photographed it! I obviously used a different white card stock for the top sentiment layer. I swear that the color difference between the layers is only visible in the photo. Starting with a top-folded white card base, I die cut a stitched rectangle, embossed it with my snow embosser, and cut an oval from the center. I stamped the image twice - once on white that I colored with my Copic markers and a second time on iridescent blue vellum with white heat embossing for the sky and snowflakes. I fussy-cut the little guys and layered them over the blue panel. Then I added another layer of snow that I had stamped the sentiment on and all layers were die cut with a stitched oval die and mounted in the center. Beware the yellow snow!

Over at Peace on Earth the vehicle images are all gas-powered, but my little guys prefer a bear-powered sled to move through the snow. 

Peace On Earth Christmas : Peace on Earth Challenge #78


PERSONAL CHRISTMAS CARD

If this looks familiar, it's a simplification of the card in the previous post - cut down to an A2 size and fewer layers so that it would be easier to duplicate. I added a silver heat embossed edge around the coral printed paper.


The interior is equally simple, using an old sentiment from my stash and Tim Holtz splatters.


I'm sharing this with Christmas Kickstart before the current challenge ends:

Christmas Kickstart Challenge: Challenge #93 - Reminder


Sunday, December 8, 2024

JOYOUS HOLIDAY

I'm sure I'm not alone in starting out with an idea for a card and ending up with something completely different! I've been mulling several ideas around in my head for our 2024 personal holiday cards. After several tries I ran this one past my husband and he likes it enough to request it as the main one we'll send out. I started by wanting to participate in the Tic Tac Toe Challenge that just posted today. My first choice was to do a White on White/Frame/Metallic (top across), but as I played with it I felt compelled to add a bit of one of my favorite colors. This threw me into one of the diagonal choices - Metallic/Embossing/Die Cuts - where I landed. 


I used a pre-made Strathmore card base with matching A7 envelopes. I haven't designed the inside yet but will work on that this week. By the time I work with this a bit there may be some changes to make it a bit more simple for a production of 25 or so cards. I'll post the completed card in my Christmas Gallery when it's ready.

I can hardly resist using my Alexandra Renke "Winter Village" dies each year for at least a couple of my cards. I die cut several of the buildings and trees from the same paper as the card base and mounted them onto a printed rectangle of dark coral card stock (the other side of this paper is rows of gifts with bows - I love both sides, but especially the coral side) that I had added some Tim Holtz spatters in silver heat embossing. I matted it with a couple of layers of additional rectangles and attached it to the face of the card. The sentiment was also silver heat embossed and the final layer was an old star cluster die that I have used many, many times.


TTTC262- Featured Designer Betty - Tic Tac Toe Challenge


Our very busy and productive friends Diane and Darlene have a challenge that I wasn't aware of (who can keep up with them?!) specifically for CAS projects. I am SO there! This will be my first entry into their challenge - Thank you, Darlene, for calling it to my attention.


Saturday, December 7, 2024

PEACE ON EARTH

Hello, all! Today I'm offering up a big wish for Peace on Earth. I know that's a big ask, but it starts with the individual and ripples from there. Diane and Darlene have the right idea with their Peace on Earth Challenge, and I'm joining them today. They gave us a great mood board for inspiration, but I'm taken by their lovely blue and white mast head and wanted to follow that with my entry.

I'm also continuing with playing around with my Hero Arts  #CM386 "From the Vault - Winter Joy" and the tiny images on this set. I think I have now used three of them and have a couple more left. I particularly like the one I used today with it's 1-1/4" square postage stamp. I stamped it with PTI "Enchanted Evening" ink and cut it out with a square die. Then on a 5-1/2" white card base I mounted a series of white die cut frames with the matching card stock and placed the postage stamp in the center opening. The final step was to layer a silver metallic star from Tim Holtz to the face. 


Peace On Earth Christmas : Peace On Earth Challenge #77


And I'm continuing to share these little images with the group at NBUS because they are all never before used:

Sunday, December 1, 2024

BE A DEER

My old friends over at The Paper Players are playing with a theme challenge from LeAnne - "Be a Deer" and I thought I would like to join them in the fun. I have only one item in my stash with a deer and I dragged him out for the first time this season, although he has been a mainstay of my collection of winter/holiday creatures for several years. I love deer and it's actually quite an amazement that I don't have any others in my stash anywhere.

I'm really partial to square format cards, so square it is! Since my little deer is whimsical I wanted to use papers and shapes that were less realistic than LeAnne's lovely blue and white image. I opted for a very old light blue polka dot paper from my stash, die cut it, and attached it to a white 5-1/2" square card base. I selected a darkish blue and turquoise polka dot card stocks to die cut with Tim Holtz's "Forest Shadows". I layered these on the lighter blue and then added a couple of layers of white edge-stitched snow drifts and an Impression Obsession sentiment and attached my little deer.


The Paper Players: PP718 - A Theme Challenge from LeAnne 


WARM HUGS

BTW, how the heck did we get to December so soon? Last week I commented on a stamp set that I have that has several small holiday images - this is the second one from the set from Hero Arts (#CM386 "From the Vault - Winter Joy"). I'm joining Inkspirational's Mood Board, where at the bottom right part of the board is a little village of houses with a black sky and stars. There are so many appealing images in this mood board that I may have to enter this challenge more than once! 


This card is a bit more complex than it appears at first glance. I started it by stamping the image twice - once on black with white heat embossing and once on white with black ink. I colored the white image with Copics, fussy cut it, and glued it over the black sky and tree. Then I die cut a small scrap of white cardstock with a stitched "cloud" outline and stamped the sentiment with PTI "Fresh Linen", glued it to the black stock, and die cut all of the layers with a small stitched rectangular die. I die cut a white cardstock panel with a larger stitched rectangle and then die cut a stitched opening in it. I used an embossing folder to emboss the snow and assembled all of the layers onto a black card base. I wanted a bit of sparkle, so added three rhinestones to the stars in the sky.


Added December 21, 2024:


 And because I haven't used this particular stamped image before, I'm also sharing it with NBUS:


Saturday, November 30, 2024

CHRISTMAS VILLAGE

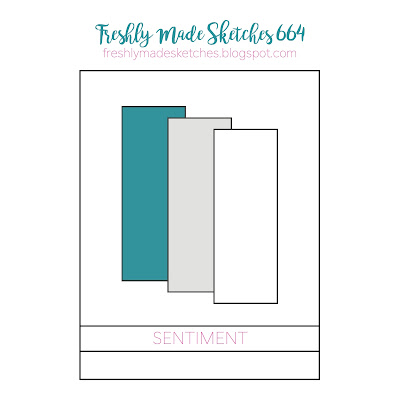
I cleaned out my Christmas scraps box yesterday, mostly for the purpose of re-acquainting myself with what was hiding there. In the process, I promised myself to make all of my Christmas cards this year out of bits and pieces to see how much I could get rid of before I buy any more paper anytime soon. I was also in search of some ideas for the current Freshly Made Sketches.


I definitely took liberties with Linda's current layout, which features three staggered rectangles and the sentiment running along below. I have these accordion-folded foil laser-cut villages that have been with my scraps for quite some time now. I used some last year on this card, but still have several of them left. I cut the buildings apart into similar-sized rectangular pieces and backed them with black card stock for the windows and door openings. I die cut a scrap of gray printed swirl paper with a stitched rectangular die and attached it to a black card base. I gold heat-embossed the sentiment on a scrap of black card stock and trimmed it with a smaller stitched rectangle, attached it to the face of the card, glued on two of the buildings and overlapped the third one with a bit of foam dimensional tape. The final additions were a die-cut foil star and lining a ready-made envelope with the last of the swirl paper.

Freshly Made Sketches: Freshly Made Sketches #664 - A Sketch by Linda


Tuesday, November 26, 2024

GREETINGS OF THE SEASON

It's mood board week at Just Us Girls and I had fun baking some gingerbread cookies to hang from tree branches, similar to the image at the bottom left of the mood board.


I started with a couple of images that I white heat-embossed on kraft card stock, adding a small bit of red, fussy cutting them, and punching holes for bakers twine hangers. I die cut some Hero Arts birch tree trunks and mounted them to a gray/silver textured stock that I had die cut into a stitched rectangle and mounted to a white card base. I die cut a second smaller rectangle from matching white card stock and die cut a circle out of it, adding a red sentiment from a well-used old Christmas sentiment stamp set (?).  I pulled the bakers twine through punched holes at the top of the circle and tied them off. The final step was to attach the front layer and gingerbread cookies to the face of the card.

I used all of my kraft A2 envelopes up for Thanksgiving cards, so made a custom one for this card and lined it with a light-weight Christmas ornament paper. 

Here's their Mood Board and the portion of the image I chose:

"Just Us Girls" Challenge: Just Us Girls #754 - Moodboard Week