Saturday, February 15, 2025

FEBRUARY MID-MONTH REMINDER - TWO OLD BATS HALLOWEEN CHALLENGE

Here we are at the half-way mark of February and yesterday was Valentine's Day. Despite all of my best intentions, I didn't get Valentines cards into the mail this year. 😞 Instead, I spent the time I would be making Valentines painting the window trim around three very large windows in my living room. The 20-year-old blinds crashed a couple of months ago and I ordered replacements. But I didn't want to hang the new blinds before I re-painted the trim - no easy task with 6 cats watching my every move and wanting to participate!


Here's my contribution for this 2-week period at Two Old Bats Halloween Challenge.

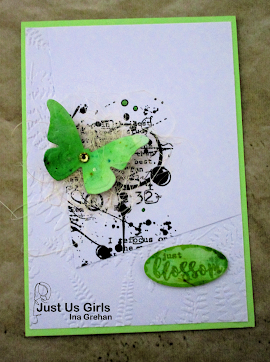
For the background, I had a scrap of old Valentine's Day paper and I stamped tiny spiders everywhere that a white dot was on the paper. I trimmed it out with a stitched rectangular die and mounted it to the face of a black card base. The little lovelorn ghost, mug, mug contents, and little dangling spider are all from a die set by Trinity Stamps - #TMD-088 "Boo Brew". I decided the mug needed to sit on a tabletop so I constructed a doily out of a couple of die cut circles and added some hand stitching with a Sharpie. I glued this to the card face and wrapped the front with black and white baker's twine and a white heat-embossed sentiment tag. I added tiny die-cut hearts to the ghostie's eyes and assembled the mug and its contents (I punched out some black drips for the edge of the mug) and added it to the face of the card with dimensional foam.   


Remember that this is an anything with Halloween challenge and the inspiration board is just a suggestion. If we get 25 entries we'll be awarding the following dies using a random drawing and you can add a couple of other entries if you wish. You have until the 28th!


Saturday, February 8, 2025

MORE SPARKLE, LESS STRESS

There's still lots of snow on the ground, so it seemed appropriate to do a snowy Christmas card today. I've been planning to participate with the ladies at Peace on Earth Christmas because they have a new inspiration board up. The stag in the top left quadrant with his antlers completely decorated gave me a chuckle, so that's where I went!

Here's what went through my head as I worked on this card: "Norman loved decorating for Christmas so much that his forest friends just didn't have the heart to tell him that he was over-dressed for the annual winter party."


I started with my favorite deer die (from My Favorite Things), and I die cut him and his antlers from two different colors of kraft card stock. I mooshed some brown ink on him and touched him up with white gel and black ink pens. I die cut part of the metal plate from PTI's "Birthday Bash" and attached it to a side-folded card base. I wanted some sparkle in the sky, so I cut a small portion of the same die out of my very last scrap of white sparkle card stock, popped out some of the circles and stars, and glued them into the openings in the top panel. I stamped the sentiment (Unity "More Sparkle, Less Stress"), heat embossed it with Red Tinsel embossing powder, and die cut the top with a stitched wave, and mounted it over the lower front of the card. I attached my little deer to the card and then had loads of fun searching out sparkly red and green card stock scraps for the foliage and cardinal he wanted in his antlers - plus an additional bough to chew on! After decorating his antlers, I added a couple of gemstones for some additional shine in the sky.


The sparkle of the sentiment doesn't show up very well - here's a closer look. And to see the green and red glitter card stock of his antler decorations, here's another close-up.


Here's the link to the challenge. (I always do a bit of a double-take when I see this referred to as the POE challenge - Poe was my maiden name!)

Peace On Earth Christmas : February 2025 Peace On Earth Challenge #81


Added February 15, 2025:


Wednesday, February 5, 2025

SNOW DAY THREE

Those of you in other parts of the country or world may think, "big deal", but for us here in Southern Oregon near the California border, we aren't accustomed to this much snow. We've had 6" here in our yard and then it froze last night (and it's still below 29 degrees), so the roads are really hazardous and we're basically house-bound. At the moment we're getting a break but another storm is approaching Friday.

So, let's make some chocolates! My inspiration this morning is Color Throwdown Challenge #826 - Pink, Brown, and White with the yummy chocolate cookies dusted with pink sugar crystals. 

I'm using my new-to-me Tim Holtz #666290 "True Love: Colorize" dies. While this card was relatively simple to make, the chocolates were not. I made the chocolates a couple of weeks ago and had them in my stash until I figured out what to do with them. The sentiment is from Simple Stories ("Simple Vintage Berry Fields") and the spatters are Tim Holtz, from one of his Halloween sets. I've gotten so much use out of this spatter stamp over the years and year-round. Somehow the top panel moved when I was stamping the brown sentiment and I got a bit of shadow, but I didn't have the energy to stamp it again and just left it.


Color Throwdown: Color Throwdown Challenge #826


Monday, February 3, 2025

DUAL CHALLENGES!

Well, this is fun! Inkspirational Colour Challenge and The Color Hues Challenge have combined forces into one great challenge using the colors Red and Pink - perfect for my push on valentines. 


I might have played a bit fast and loose on the colors, using red and pink with a touch of warmth to them. I liked how the ivory tone of the watercolor paper combined with the warmer reds and pinks.

I die cut an older Penny Black "Fancy Heart" from a square of heavy, creamy watercolor paper and glued the heart back in place. I attached a die-cut red heart in the center and threaded a needle with ivory silk thread, knotted it, pulled it through the heart, and tied it off in the back. I mounted the printed heart paper to a square red card base and attached the front panel over it with dimensional foam so that there would be a definite 'window' in the face.

Here's a closer look:


Inkspirational: Inkspirational Challenge #334 - COLLABORATION with Color Hues Challenge #103 - RED AND PINK


SNOW DAY!

Southern Oregon (well, most of the Northwest) is having its first snow day of the winter, and what better thing to do than sit in a cozy craft room and make cards? My dentist appointment was rescheduled and the planned lunch with my daughter-in-law was cancelled. So I decided to play along with everyone at Just Us Girls and their fun challenge to CASE one of the members of their Design Team.

Hello, Ina, thank you for letting me copy and share your wonderful card! I've always loved these sort of grungy AALL & CREATE "Scripted Botanicals" but never really quite knew what to do with them. Ina was right on spot with her use, so I couldn't resist following her lead, although I moved things a bit, moving the butterfly down toward the sentiment so the sentiment wouldn't get lost.

My embossed base panel is a Cuttlebug folder that I experimented on creating a void for a sentiment, but was only partially successful. I ended up trying to knock down some of the embossing on the lower right corner with a burnisher and wasn't completely successful, but managed to stamp the sentiment from the same Scripted Botanicals set. I stamped one of the images in black, over-stamped splatters with  PTI "New Leaf" die ink, and trimmed it like Ina did. I glued the stamped panel to an extra piece of card stock to make it stand away a bit from the embossed base and attached all of the layers to a green card base in my stash. The butterfly is one of the old "Beautiful Butterfly" stamp sets from PTI, which I fussy cut because the matching die would have cut away her antennae. A green gemstone and custom envelope finished things off.

My take is that Ina's card is better - more contrast and prettier color. Here's Ina's inspiration - go to Just Us Girls and check it out:


"Just Us Girls" Challenge: Just Us Girls Challenge #760 - CASE a DT Week

The view from our kitchen door - it started snowing about 6:30 this morning, and as I publish this at 11:30 it hasn't stopped. You can see how the clumps of ornamental grasses in the foreground have collapsed under the weight of the snow. Our little colony of feral cats is hunkering down in the covered patio.


Saturday, February 1, 2025

FEBRUARY TWO OLD BATS HALLOWEEN CHALLENGE

Here we are in February, and if you're on the same page with me, I'm working to get my valentines completed and mailed out to family and friends. You can see an obvious theme here from Diane with her new February inspiration board.


And my response to it:


I don't have any pink Halloween paper in my stash, other than the bright pick one I used for the mat and sentiment banner on my card, so I made some with pink ink. I started with an ancient corner cobweb (probably Inkadinkado) and PTI "Hibiscus Burst" ink and stamped it on a white cardstock panel that I had trimmed out with a deckle-edge rectangular die. I also stamped it on the corner of a second white panel and trimmed it with a stitched rectangular die. I blended pink ink on both panels, as well as adding a blended circle where I intended to stamp the spider's body. I added some Tim Holtz splatters in black and mounted the white top panel to a bright pink patterned paper and black heat-embossed my elegant little spider, adding a black line for her to dangle from. I added a black and white cobweb paper layer that I had cut with a larger deckle-edge die, stacked them all together and attached them to the face of the white card base after mushing some pink ink on the lower right corner. The sentiment was stamped with black ink on a strip of bright pink, before adding it and a bit of embellishment - black embroidery floss and a pink brad. 


This photo shows off the shiny surface of my little spider. I made a custom envelope from pale pink lightweight paper and lined it with a piece of coordinating black and white printed cobweb paper. I think I've finally used up all of my scraps of this paper years after purchasing a whole pile of it for Halloween cards way back when. I'm rather pleased with this card!


CONTINUING WITH VALENTINES

It's raining today, giving me an excuse to work on valentines instead of getting ready for spring in the garden. The garden can wait. February 14 will begin to close in on my this next week or so. I'm not sure I'll get a complete set of 30 cards ready, but I'll make the effort.

I had some scraps of printed paper in my Valentine's Day bin that I had die cut to make small postage stamps for the CAS challenge last month at The Paper Players. I ended up doing something else and set them aside, thinking I would use them somewhere along the line. Enter the first challenge of the year from Tic Tac Toe and Time Out Challenge as inspiration! 

I used Silke's diagonal row of Hearts/Red/Ribbon to reassemble my scraps. I had some iridescent pink scraps that I die cut with two sizes of stitched rectangles onto which I stamped a postage cancellation in gray and then glued the stamps in place and stamped once again. Then I die cut a PTI 'Love' from the stamped face of the smallest rectangle to use the spotlight technique (one of my favorites), building up the sentiment with several layers of pink cardstock and placing a red heart behind. I glued all of the layers together with an ivory watercolor paper as a mat, using the paper's deckle edge for the bottom. Finally, I prepared an ivory card base, punched a double rectangle on the right edge, wrapped a red satin ribbon around and through the punched openings, and assembled all of the layers.

TTTC263- Featured Designer Silke - Tic Tac Toe Challenge


This card is also appropriate for an additional challenge: Time Out Challenges #281 - "Pick 2", wherein we are challenged to use two of the words from their list for our cards. I selected 'Layer' and 'Love', but could also include 'Heart and 'Stitch'.


Added February 20, 2025: