Showing posts with label St. Valentine's Day. Show all posts

Wednesday, February 5, 2025

SNOW DAY THREE

Those of you in other parts of the country or world may think, "big deal", but for us here in Southern Oregon near the California border, we aren't accustomed to this much snow. We've had 6" here in our yard and then it froze last night (and it's still below 29 degrees), so the roads are really hazardous and we're basically house-bound. At the moment we're getting a break but another storm is approaching Friday.

So, let's make some chocolates! My inspiration this morning is Color Throwdown Challenge #826 - Pink, Brown, and White with the yummy chocolate cookies dusted with pink sugar crystals. 

I'm using my new-to-me Tim Holtz #666290 "True Love: Colorize" dies. While this card was relatively simple to make, the chocolates were not. I made the chocolates a couple of weeks ago and had them in my stash until I figured out what to do with them. The sentiment is from Simple Stories ("Simple Vintage Berry Fields") and the spatters are Tim Holtz, from one of his Halloween sets. I've gotten so much use out of this spatter stamp over the years and year-round. Somehow the top panel moved when I was stamping the brown sentiment and I got a bit of shadow, but I didn't have the energy to stamp it again and just left it.


Color Throwdown: Color Throwdown Challenge #826


Monday, February 3, 2025

DUAL CHALLENGES!

Well, this is fun! Inkspirational Colour Challenge and The Color Hues Challenge have combined forces into one great challenge using the colors Red and Pink - perfect for my push on valentines. 


I might have played a bit fast and loose on the colors, using red and pink with a touch of warmth to them. I liked how the ivory tone of the watercolor paper combined with the warmer reds and pinks.

I die cut an older Penny Black "Fancy Heart" from a square of heavy, creamy watercolor paper and glued the heart back in place. I attached a die-cut red heart in the center and threaded a needle with ivory silk thread, knotted it, pulled it through the heart, and tied it off in the back. I mounted the printed heart paper to a square red card base and attached the front panel over it with dimensional foam so that there would be a definite 'window' in the face.

Here's a closer look:


Inkspirational: Inkspirational Challenge #334 - COLLABORATION with Color Hues Challenge #103 - RED AND PINK


Saturday, February 1, 2025

CONTINUING WITH VALENTINES

It's raining today, giving me an excuse to work on valentines instead of getting ready for spring in the garden. The garden can wait. February 14 will begin to close in on my this next week or so. I'm not sure I'll get a complete set of 30 cards ready, but I'll make the effort.

I had some scraps of printed paper in my Valentine's Day bin that I had die cut to make small postage stamps for the CAS challenge last month at The Paper Players. I ended up doing something else and set them aside, thinking I would use them somewhere along the line. Enter the first challenge of the year from Tic Tac Toe and Time Out Challenge as inspiration! 

I used Silke's diagonal row of Hearts/Red/Ribbon to reassemble my scraps. I had some iridescent pink scraps that I die cut with two sizes of stitched rectangles onto which I stamped a postage cancellation in gray and then glued the stamps in place and stamped once again. Then I die cut a PTI 'Love' from the stamped face of the smallest rectangle to use the spotlight technique (one of my favorites), building up the sentiment with several layers of pink cardstock and placing a red heart behind. I glued all of the layers together with an ivory watercolor paper as a mat, using the paper's deckle edge for the bottom. Finally, I prepared an ivory card base, punched a double rectangle on the right edge, wrapped a red satin ribbon around and through the punched openings, and assembled all of the layers.

TTTC263- Featured Designer Silke - Tic Tac Toe Challenge


This card is also appropriate for an additional challenge: Time Out Challenges #281 - "Pick 2", wherein we are challenged to use two of the words from their list for our cards. I selected 'Layer' and 'Love', but could also include 'Heart and 'Stitch'.


Added February 20, 2025:


Thursday, January 23, 2025

PURR-FECT

Continuing in my CAS mode... I haven't played over at CAS Colours & Sketches for a bit and couldn't resist turning out another Valentine. Their Challenge #552 is a great layout for a CAS card and I'm all over that! 


You'll notice that I changed the format a bit to a vertical A4 because I thought my little kitty would work best vertically. I have this very old Inkadinkado stamp set that I've used so often, but have never used her image. I stamped her with black ink on white cardstock and fussy cut her out. I made a white side-folded card base and die cut a stitched panel from the same cardstock and tore the lower corner off. I then inserted some Valentine's Day card stock behind, attached both layers to the face of the card, and over-stamped the sentiment in black. I nipped off the top of a die cut heart and attached it to the kitty's mouth and glued her to the front of the panel with a bit of dimensional foam.

I liked this layout so much that I played with it some more with different papers, because I think I'll use this card as this year's Valentine for family and friends. Considering my reputation as "the crazy cat lady", it seems quite appropriate!


CAS Colours & Sketches: Challenge #552 - sketch 


Added February 8, 2025:


Monday, January 20, 2025

YOU'VE GOT MAIL

And while I'm on a CAS kick, I popped over to The Paper Players Challenge #PP721, a Clean-and-Simple challenge from Jaydee - "Postman bring me a letter".


This is as CAS an it can get! I started with a white A2 card base and a slightly smaller matching white panel. I stamped the postage sentiment with dark gray ink and glued a die cut postage stamp from some white cardstock and printed paper over the top, after die cutting a small heart from the larger one and inserting a pink heart into the opening. I overprinted the postage cancellation stamp one more time and BAM! Done.


The Paper Players: PP721 - A Clean-and-Simple Challenge from Jaydee


Added January 25, 2025:


FOLLOW THE LEAD

The design team over at AAA Cards Challenge #282 has come up with a really fun challenge they're calling "Follow The Lead" that I couldn't resist! Marlies is this month's leader and she has produced this wonderful almost completely white layered die cuts card with a single red heart - how much fun is that? Our challenge is to create a card that in some way jumps off from her gorgeous card.


My approach to Marlies' card was to follow her idea with layered dies and a single red heart in the lower right corner:  


I started by die cutting a white cardstock stitched rectangle and then die cutting one of my favorite heart dies (Penny Black #51-182 "Fancy Heart") off the edge. I die cut the heart a second time and mounted it back onto the rectangular panel after adding the sentiment in red ink. I die cut one of the cute little birds and branches from My Favorite Things and added him, along with a tiny red heart, to the face of the top panel with some dimensional foam. The final step was to layer this panel over the face of a white card base with more dimensional foam.   


You really must go over to the link and check out all of the incredible cards that the design team has come up with, following Marlies' lead:

AAA Cards: AAA Cards Challenge #282: Follow the Leader


And while I'm sharing my card, I'm also dropping in at Diane and Darlene's Simply Clean & Simple January Challenge:

Simply Clean & Simple: Simply Clean & Simple January 2025 Challenge


Added February 6, 2025:


Saturday, January 11, 2025

MASCULINE VALENTINE

A couple of the current challenges looked like they were perfect for making a valentine for my hubba - Color Throwdown #824 - "Black, White, and Gray" and Just Us Girls #757 Word Week, "Masculine".

I fumbled around a bit and finally settled on an old PTI stamp from their "Love & Marriage" set that I think I've used only once before - I love this image, but forget that I have it! I stamped it twice with black ink - once on white card stock and again on gray cardstock - and die cut a heart (also PTI) from both images. I overprinted the tiny sentiment with silver heat embossing. Then I layered the gray heart over the black and white image with some black dimensional foam. I trimmed out the image with stitched rectangle and matted it with some of the gray stock. Before adding the various layers to a black card base, I edged the gray mat with silver embossing and added a tiny heart to the gray heart.

I think you can see the dimensional heart and silver embossing a bit better with this close-up photo:


Color Throwdown: Color Throwdown Countdown #824 


Friday, January 10, 2025

NAUGHTY KITTY

I'm sharing my bit of morning fun with a couple of my favorite challenges - NBUS Challenge #79 and Color Hues Challenge #TCH1010 - Red and Kraft

This is my second outing this month with Color Hues Red & Kraft. I think I mentioned in a previous post that I had received a new die set - Tim Holtz #666290 "True Love, Colorize" that I hadn't broken into yet, but I thought I would play with it later this week. Well, here we are. This is a really complex set of dies, so I didn't do the full box of chocolates. I just played with putting together the bottom box and three of the chocolate variations. And I just could not resist doing something with one of my beloved Tim Holtz Snarky Cats! Especially since naughty kitties were on my mind this morning as one of mine was on the dining room table raiding small pebbles out of the bottom of one of my pillar candle holders.


As usual, I had problems with photographing this card - my cellphone does not like red. I tried adjusting the color in my photo editing application, but couldn't quite get to the colors on the card. Suffice it to say, they are variations of red and kraft with a bit of brown thrown in.   

I started with a dark red 5-1/2" top-folded card base. I added a band of bright red to the lower part of the card and started assembling the box and some chocolates. I stamped my naughty cat and the sentiment with dark brown ink on kraft, colored the kitty with Copic markers and white gel pen, and fussy cut him. I trimmed the sentiment into a strip and adhered it above the red strip and glued the box of tampered with chocolates over, trimming the left edge. I attached the cat with a bit of dimensional foam and added some splatters here and there. The final step was to create a coordinating envelope that I lined with a bit of dark red vellum.


NBUS: NBUS Challenge #70


Color Hues: Color Hues Color Challenge #101 - Red & Kraft


Friday, January 3, 2025

FIRST VALENTINE OF 2025

Inspired by two challenges - Freshly Made Sketches #667 and Color Hues Challenge #101 - Red & Kraft, I set out this morning to make my first Valentine of the year. I love making Valentines almost as much as I love making Halloween cards! 


I started by creating a 5-1/2" square card base and cut two additional smaller square panels in white and kraft cardstock. I die-cut the top layer of Birch Press Design "Folk Art Heart" from the center of the white square and matted it with the kraft square, slipping a piece of red cardstock between the layers as the background for the layered heart. Then I die cut two additional layers of the pattern in kraft and a lighter color of red and glued them all in place, adding the final layer - the white top layer I had originally cut from the white square. I attached the layers to the face of the card and added a white heat-embossed sentiment on a strip of black cardstock and a double bow from Tim Holtz "Vault Festive Wreath". The final step was a tiny bit of bling with some small rhinestones. I'll make a coordinating envelope at a later date. 


I don't think I'll use this design for this year's edition for a couple of reasons - 1) it's too complex for an edition of 30, and 2) it's square and too expensive to mail out. I'll save it for someone special and hand deliver it. 


Here are the links to the two challenges:

Freshly Made Sketches: Freshly Made Sketches #667 - A Sketch by Cécile


Sunday, February 4, 2024

AAA CARDS CHALLENGE #258 - SKETCH

Today I have the honor of being Guest Designer at AAA Cards Challenge #258 "Sketch"! This is my 4th time as Guest Designer at AAA Cards Challenge - it's always such a treat! I decided to use this challenge for a Valentine's Day card. Here's a link to the challenge and the sketch:


I mulled this around in my brain a bit before finally starting on the card. It looked like the intent was to predominantly use 1/3 of the left side, balanced on the right by the sentiment. I chose to use one of my old standby die sets from Impression Obsession (DIE169-R "Hollyhocks") - I love this die set and don't seem to get tired of using it. For this rendition I decided on using some very old Valentine's printed 2-sided paper - green and black floral on one side and coral and red pattern on the second. I cut the hollyhock stems from both sides of the paper and fussy cut and glued the blooms from the coral side to those on the green side. Then I went in search of some paper that worked well with those colors - I thought this warm gray was perfect. As I started laying out the hollyhock stems, I felt I needed a bit more green and a subtle background to anchor the stems. I cut a gray panel with a stitched rectangular die and stamped a PTI flourish on the left with Hero Arts "Wet Cement" ink (another favorite). Then I stamped the sentiment with PTI "Ocean Tides" and glued the panel to the card base. I determined I needed a couple of extra branches to balance the hollyhocks and die cut them from Birch Press Design #57529 "Budding Twigs Contour Layers", without using the buds, and glued all of this onto the face of the card. The final addition was a couple of coral die cut hearts to extend the images upward.


I custom made a coordinating envelope and lined it with lightweight gray-green paper.
Thank you, AAA Card Challenge for letting me play along this month as Guest Designer!


Tuesday, January 30, 2024

VALENTINE'S KISSES

In December I won a challenge over at Time Out Challenges in which I was given a gift certificate for Birch Press Design and I couldn't pass on using it toward this charming "Folk Art Heart" layered die (among others!) and I've been wanting to play with it. The die is actually 3 layers, but I only used Layers A and C for this Valentine's Day card. I wanted to do a CAS card for AAA Cards Challenge #257: Anything CAS goes (Valentine's Day) and Tic Tac Toe Challenge #239. Sadly, I'm not sure I'm going to really get any Valentines mailed this year, but I will make a couple for family members.

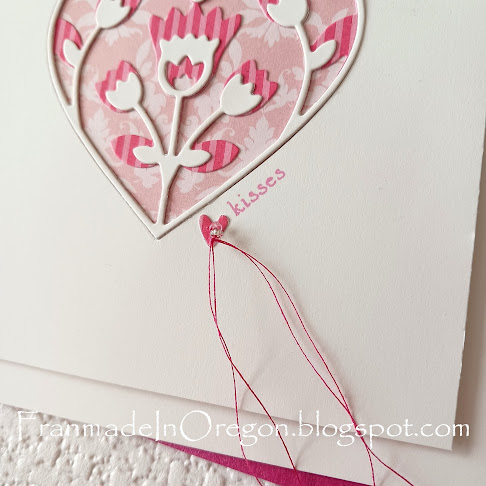
This card was started with a 5-1/2" square white card base and a 4-3/4" square white panel. I die cut Layer C from the center of the smaller square panel and backed the opening with some PTI printed paper in "Blush". The tiny sentiment was stamped from "Hero Greetings" #CM351 with PTI "Hibiscus Burst" ink. Layer C of the die was cut from PTI patterned stripe in "Hibiscus Burst" and layered into the heart opening of the smaller panel and the final white cardstock layer went over that. I added a tiny die cut heart from PTI to accent the sentiment and pulled through some dark pink thread and a couple of clear crystal beads to embellish it.


When I opened the package from Birch Press Design, they had also included some beautiful bonus envelopes!  The one in these photos is a 5-3/4" square iridescent bright pink one.

AAA Cards: AAA Card Challenges #257: Anything CAS goes (Valentine's day)


For the Tic Tac Toe Challenge I am entering this card for the diagonal row: Punch or Die Cut/Patterned Paper/Pink.


Sunday, January 29, 2023

YOU & ME & CHLOE

Yesterday when I was messing around with trying to pull together a card for a Freshly Made Sketches challenge, I had more than one extra stamped and colored Valentine wreaths (Penny Black "Wreath Whimsy" #30-654) and I decided to use one of them for a Time Out Challenge #230 "Inspired by Words" this morning. I made this Valentine card for my loving husband of 37 years: 


I stamped the wreath with PTI "Scarlet Jewell" and colored it with Copic markers yesterday and this morning I trimmed the cardstock to a stitched die-cut rectangle and die-cut a stitched circle from the center. I stamped the sentiment on the front of a folded card base. The sentiment is part of a stamp set I bought last year. I haven't used this sentiment before and discovered that the ME is messed up - bummer! (That will teach me to wait a year to use a stamp and it can't be returned.) I added some small, stamped hearts with PTI "Pure Poppy" to partially disguise the messed-up letters. I mounted the rectangle to the card base and glued a couple of MFT birds die-cut from scraps to further disguise the ME. Very simple but made with love! 


I carried this card and a 12x12 white paper and overlaid paper lace into the guest bedroom to photograph it on one of the beds because the light was best there (although a bit yellow this morning). Chloe (mother of the kitties we've been fostering) follows me around the house like a puppy and decided to photo-bomb the picture!


TIME OUT Challenges: Challenge 230 - Inspired by Words 


Saturday, January 28, 2023

FIRST VALENTINE

I've been debating about whether to send out Valentines this year - it's been a really busy month and I'm feeling a bit burned out. The window of opportunity is narrowing, but I have so many pink and red scraps that need to be used up! I thought I would start with a couple that will probably go to family members and the closest friends and we'll see how it goes.

I started with a challenge sketch from Freshly Made Sketches - #570 by Jen T. I might have done this card at least three times because it just wasn't happening. I had decided to do a reverse circle to use a favorite wreath from Penny Black ("Wreath Whimsy" #30-654) but I wasn't finding the right size circle dies large enough to cut around the wreath and still have space for the horizontal element - everything was too small or too large.


I stamped the musical measures on a piece of white cardstock with PTI "Sweet Blush" and trimmed it with a stitched rectangular die. After over-stamping the wreath with PTI's "Scarlet Jewel", I colored the hearts and leaves with Copic markers, die-cut a stitched circle from the center of the wreath, and added the sentiment in Scarlet Jewel. I also rimmed the circle with a slightly smaller red circle. The dove is from Impression Obsession (#SS-176-E "Bird with Hearts") and I glued him to a scrap of pink polka dot paper and slipped him behind the opening before attaching the front panel to a card base with dimensional foam. 


I think while I'm sharing this card, I'll also send it over to the Tic Tac Toe Challenge #194 by featured designer Joanne where it fits with the left column down - Die Cut/Heart/Patterned Paper.


Added February 4, 2023:


That's it for today - thanks for stopping by!