Showing posts with label Personal Home. Show all posts

Thursday, May 1, 2025

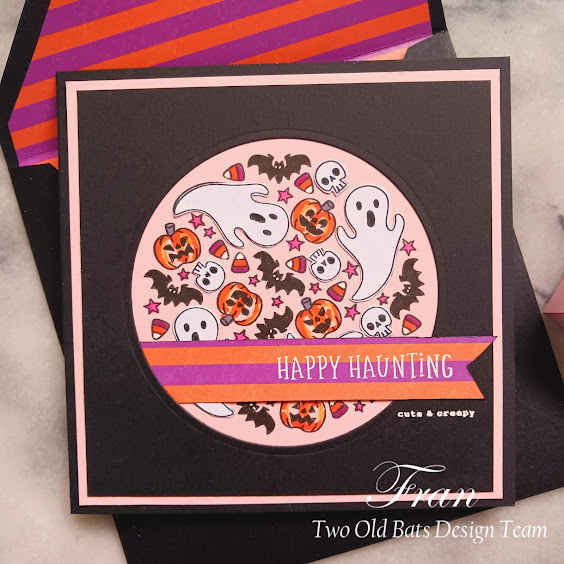
MAY TWO OLD BATS HALLOWEEN CHALLENGE

May has arrived here in Blogland and our favorite ghoul friends have posted a new inspiration board that is sure to interest you! Here we are back at a pink theme, but this time I came armed! 


I was drawn to the cupcakes in the lower right quadrant - especially since I have a brand new-to-me stamp set from Newton's Nook Designs (#NN2008S07 "Spooky Roundabout") that I got to play with. I used a black 5-1/2" square card as my base. I trimmed a piece of pink card stock to 5-1/4" square and stamped the "roundabout" image on it with black ink. I stamped the same image a second time on white heavy paper and fussy cut all of the ghosts and skeletons from it and glued them to the pick card, The rest of the images in the circle were colored with Copic markers. The final layer of the card is a black 5" square with a circle die cut from the center and laid over the pink square. The sentiment was white heat embossed onto a strip of orange and magenta striped print paper and inserted into the side of the die-cut circle. I used a bit of white gel pen for bats' eyes and the tips of the candy corn. The "cute & creepy" was a white heat embossed afterthought.

I made a custom square envelope with black heavy paper and lined it with the same orange and magenta stripe I used for the sentiment.

Today's treat box is  brought to you by the color pink! The ghost is a sticker that I adhered to a scrap of cardstock and fussy cut. I die cut a couple of circles (black and the orange/magenta), attached all to the box plus a couple of die cut bats, and tied off with magenta and orange twine from my stash.

Additionally, over at Tic-Tac-Toe Challenge, one of the diagonal choices from the Featured Designer Jeanie is "Die Cut/Patterned Paper/Treat Holder". My little Ghirardelli Halloween treat box certainly fits within that with the die-cut bats and circles - one with patterned paper.


ON A PERSONAL NOTE: Speaking of pink, how about this Oklahoma Red Bud tree in my front yard? As I've often commented about here on my blog, we tore out a lot of grass in our front yard and replaced it with a smaller patch and native pollinator plants. It was finished last summer and this year the grasses and shrubs from last year are starting to bloom. This is the second year of our red bud tree and it's been glorious! We also have purple sage and paprika-colored yarrow just about to open up - can't wait to see it all in bloom at once!


Saturday, September 28, 2024

HAPPY FALL!

AHHH, my favorite time of the year! I was wanting a break from Halloween cards (although I still need a couple more), so the Freshly Made Sketches current challenge provided a nice respite. 


There's not much to say about this card, as it's so CAS. The vining pumpkin image is a really old stamp set - probably one of my first fall stamps. I stamped it with PTI "Ripe Avocado", repeating the image across the full width of the white card stock panel. Then I added the sentiment from Impression Obsessions #WP684 "Leaf Set" and colored the pumpkins with my Copic markers. The final steps were to trim out the image by die cutting a stitched rectangle, attaching it to the face of a white card base, and creating a custom envelope.

Freshly Made Sketches: Freshly Made Sketches #655 - A Sketch by Jen B


On a personal note:

I've been planning for some time to share our new pollinator garden with you. I've made mention several time of it since it's been a 2-year project in the making. We completely tore out the front lawn that went almost down to the street and have replaced it with a smaller lawn area and lots of bee and butterfly-loving native grasses, shrubs, and perennials. 

Here is the day in October 2022 where everything had been removed and the area to become lawn was being leveled and prepared for irrigation:


And here is a shot from the same angle showing the newly renovated garden yesterday morning:


The lawn and plants near the entry were installed in July 2023 and the plants here on the slope were just put in this past May. We're really pleased with the outcome, as are the bees and butterflies - then there's the cats... So far the playful kittens have only destroyed one plant. By next year I'm hoping they can find other forms of entertainment!

Did I mention we have a community of now 15 feral cats that call our property home? They're all spayed and neutered and have been named, so I doubt they're going anywhere else anytime soon.

Thursday, April 15, 2021

KITCHEN PROJECT


I've been planning for some time to share photos of our kitchen renovation that was finally completed this winter. We didn't have the funds to do a complete remodel so kept it modest by maintaining the same footprint, while opening it up to the dining room. The dining room was the original living/dining room of our 1956 ranch-style home. Sometime during the 60s the house was expanded by adding a large living room and new garage, leaving the old living room functioning as a family room. The kitchen was never expanded and when we moved in to the house with our teenage son in 1986 the kitchen was tiny, dark, and highly inefficient. The kitchen had been updated sometime in the 70s, as indicated by the harvest gold appliances. The washer and dryer location was also in the kitchen and cut back even more on usable space. The 70s changes were so poorly done that in order to open and load the dishwasher we had to first open the oven door for clearance. This kitchen needed SO MUCH WORK! Over the years it has been a work in progress, adding improvements as we could afford them. Last year before the beginning of the renovation the room looked like this:

This was actually a major improvement from when we first moved it. Over the years we removed an overhead cabinet that hung over the breakfast bar, replaced a solid wood door to the patio area with a French door, replaced the old vinyl floor, enlarged the window over the sink, put in a skylight, and had pantry cabinets built along one whole side of the kitchen. The plastic laminate countertops were chipped and split at the seams so we started by planning to replace the countertops with quartz. So, if we replace the countertops shouldn't we also replace the sink and cooktop, and how much would it cost to remove the old breakfast bar and have all of the doors and drawers replaced, and what about widening the opening to the dining room? That's how it all started. 

To shorten this whole story, here we are now:


New quartz countertops, cooktop, sink, tile backsplash, vent hood, overhead cabinets, and wider opening into the dining room. We didn't want to go to the expense of all new cabinets so the cabinet shop installed new face frames, doors, and drawers in the lower existing cabinets and built two new overhead cabinets. We chose to have these painted instead of stained, but brought the wood over to the bar top and open shelves on the dining room side to pull it all together.


So, it's not my dream kitchen but it is so much more efficient - and we finally have enough storage for everything. While the kitchen is still minute, it now feels very open. 

Sunday, November 15, 2020

WELCOME FALL


A view of my dining room buffet decked out for Fall.

This next week will be very busy as workmen are arriving tomorrow morning to tear up my kitchen in preparation for new countertops, sink and faucet, cooktop, vent hood, and some new overhead cabinets. Our kitchen is tiny and as much as I would love to just tear out the wall between kitchen and dining and start from scratch, it ain't gonna happen! So we're satisfying ourselves by just widening the opening between the two rooms and adding a bar-height counter on the dining side. It's pretty minimal but will at least open the rooms more to one another. Given any other year I wouldn't proceed with this project the week before Thanksgiving - but 2020 is not like any other year I've known in my 3/4 of a century on this earth. We'll not be hosting a large family gathering this year. Oregon is partially closed down again for the next two weeks and gatherings of more than 6 are discouraged.


Monday, August 31, 2020

THE MONEY PIT


 Oh my! When it was apparent this year that we would not be going on a vacation as a result of the pandemic, we decided to move forward on a long-overdue master bath shower renovation. 

When we moved into our mid-century ranch house in 1986 we had only been married for a year, my husband was starting in a new teaching career, I was starting a new interior design business, and my son was just 12 years old. The house was pretty much a wreck and over the years we did what we could with limited resources to make the place a home. The master bath was painted a lime green and the old 1956 yellow and maroon ceramic tile was still in place - I think the previous owner was red/green color blind! I painted the trim and installed a neutral wall covering. But that was 34 years ago and lots of water under lots of bridges. About 5 or 6 years ago we finally started to make some improvements in the space but here's what it looked like at that time before we started:


Now, that's pretty embarrassing for a professional interior designer! The vanity cabinet is falling apart, the drywall next to the shower is damaged, and the old vinyl asbestos tile flooring is cracking. During these 20-25 years we hadn't been idle with our home improvements - we had replaced the roof and several single-pane windows, 2 water heaters, painted inside and out, remodeled the primary bath, and had a heat pump installed and all of the old baseboard electric heaters removed. Oh yeah, and we also sent our son to college. Our master bath was a pretty low priority.

So 5 years ago we encapsulated the old asbestos flooring with a new sheet vinyl and replaced the toilet. Three years ago we had the old cabinets, tile countertop, and splash torn out and replaced. We also took a bit of space out of the walk-in closet to the left between the studs for medicine and toiletries storage and added bead board wainscot and wall covering on all of the walls. At the same time we had the plumbing moved to be centered on the wall and moved the location of the outlet.


Fast forward three years to June 24th of this year. We were now ready to finally finish off everything by having the shower remodeled. I was sick of cleaning tile grout in the shower, the shower door was disgusting, and the ceiling of the shower was only 6'-5" in height (my husband is 6'-3"). We decided on having the ceiling raised and having the entire shower covered with a solid sheet acrylic product.

The problems started on the first day of demolition when the tile and 2" of mortar were removed and behind it was decades of black mold and dry rot. They also found a second tile floor under the first. When they got the second floor jack-hammered out they found that the old iron drain was completely rusted out so they had to jack-hammer the concrete out away from the drain so the plumber could come in and replace it. This first photo is how everything looked about the 3rd day into this project.


On the right the contractor has replaced all of the dry rot and cut down the wall next to the vanity to open the shower up to some more light. But the discoveries continued daily. They had to replace the floor because water had seeped beneath the sheet vinyl and compromised the backing. The complete floor had to be torn out back to the concrete and new luxury vinyl water-tight floor installed.

This whole fiasco finally ended last week after many additional costs and delays. It's hard to imagine that this tiny space could have been such a BIG DEAL. We do love our new, bright and clean shower! 


What's left? Onward to the kitchen after we catch our breath and recover from the expense of this project.