Sunday, December 3, 2023

ANGEL WINGS

I started my day yesterday with the intention of participating with the new Color Hues #77 - Pink & Silver" challenge. Other than wanting to add to my Christmas card stash, I wasn't clear on what I hoped to accomplish. With those colors it seemed I needed something frothy and textural. I hit on the idea of maybe angel wings and remembered an old Tim Holtz die that a friend gifted me with quite a few years ago. It's one of those old really thick Sizzix dies (#658259 "Layered Angel Wings") that came out before the thin steel ones and I've never used it, because the image was like a pair of disembodied wings and I didn't know what to do with them! I think the idea was to use them on altered art behind one of the Holtz sepia-toned vintage cut-outs. In any case, the die has been in my stash for a very long time and I decided to drag it out and see what I could do with it. 

I can't decide how I feel about this card, but I spent so much time making it that I have decided to just throw it out there like spaghetti at the wall and see if it sticks!    

I had thought to make the wings with layers of different colors or textures of vellum - like a ballerina's tutu. I cut so many layers with different vellums but couldn't decide on how to present them. I decided on a square format with ivory heavily-textured watercolor paper. I made a top-folded card base, using the deckle edge for the bottom opening. I cut a smaller square and die-cut another Tim Holtz die (#663117 "Snowy Stars") and matted it with silver metallic cardstock and glued it to the face of the card base. I attached the wings to the face of the card and added a silver star and pink brad between the wings to suggest a "celestial being" delivering tidings of comfort and joy. But after a strenuous search through all of my Christmas stamps, nowhere could I find that sentiment, so I settled on Peace on Earth - which we could certainly use a bit of this holiday season.

So, there it is. Like I said, I can't decide about it - it's either brilliant or completely missed the mark! I'll let all of you decide. đŸ˜…  


Color Hues: Color Hues #77-Pink and Silver (colorhuesthecolorchallenge.blogspot.com)


Added 1/01/24
Nice way to start the new year!


Postscript: Just as I was uploading this card on the Color Hues blog, I saw a lovely card by TK that I wanted to comment on and it led me to a new-to-me challenge - NBUS - "Never-Before-Used-Schtuff. What a great idea - I'm in!


AND, also added 1/01/2023
From Darnell @ NBUS

"The wonderful thing about human resilience is that we never give up hope for peace on earth. Congratulations, Fran, your card represents that hope beautifully."

MERRIEST WISHES

Well, this has been a fun card to make! I picked up some random light-weight Christmas papers at a sale this past week without any intentions for what I would do with them. I generally use the light printed papers to line envelopes. It's Sunday and time for a new challenge at The Paper Players, so I thought to use one of the papers for our new challenge hosted by the brilliant Jaydee - "It's Beginning to Look a Lot Like Christmas".


I started out inspired by the current sketch at Freshly Made Sketches, which features an arrangement of circles running at a diagonal across the card with a sentiment cutting through. I thought to fussy cut a bunch of the ornaments from one of the papers (you can see it being used as the lining on my coordinating envelope), but first adhered a strip of the paper to heavier white card stock to give each ornament a bit more weight. I die cut a stitched rectangle slightly smaller than the A2 side-folded card base and just started gluing on the ornaments randomly. I white heat embossed the sentiment on a black strip of cardstock and glued it over the top of the ornament arrangement, tied a black & white baker's twine bow, and attached the panel to the face of the card base with some dimensional foam. I popped up one of the ornaments with foam and overlapped it onto the sentiment strip. Then for a final touch of festive bling, I glued on some pink sequins.

I'm looking forward to seeing what our Paper Players blog followers do with Jaydee's theme. You should see what the other designers have come up with to inspire you! Hop over to our blog and check it out:

The Paper Players: PP669 - A Theme Challenge from Jaydee 


 I'm also including my card in the challenge at Freshly Made Sketches #614:

Freshly Made Sketches: Freshly Made Sketches #614 - A Sketch by Jen B 


Friday, December 1, 2023

DECEMBER TWO OLD BATS

Yes, we at Two Old Bats Halloween Challenge are just batty enough to attempt combining Halloween and Christmas images! This is always a bit of a struggle for me, but I came up with a card I'm actually pleased with, based on the upper left quadrant of our inspiration board.

Two Old Bats Halloween Challenge: December 2023 Anything Halloween


I started with a white top-folded card base and a winter holiday sentiment usually used on Christmas cards. I stamped an Impression Obsession jack-o-lantern image in black and colored him with my Copic markers. Then I over-stamped an old PTI Christmas light string, fussy cut some tiny, printed candy corns for lights and dropped a spider from the string. I added the little web at the light string with a fine black pen. The sentiment from Impression Obsession was the final layer and I die cut this all into a deckled edge rectangle, matted with black card stock. It was all looking a bit bare, so I added the striped paper at the bottom of the card and attached the die cut panel to the face of the card. A handmade envelope from coordinating card stock finished everything off.

If you're in the middle of your Christmas cards, just pop on a Halloween image and send it on to us for our enjoyment! If we get to 25 entries there's always a drawing for a special gift. Check in with all of our designers and see what they're offering up for this December challenge.

Tuesday, November 28, 2023

AND ONE MORE!

Here's a sort of bonus of a second card today - this one, while I'm still on my black, white & gold kick, is not attached to any of the challenges. It's just a bit of playing around on my own. I'm trying to fill in with as many Christmas cards as I can early enough that I'm not rushed as we near Christmas.


Some years ago I had purchased a pile of shiny gold folded laser-cut villages that were in a sale bin in one of the local art supply stores and they've been languishing in my stash since then. I didn't know what I wanted to do with them and this is my first effort. I started by white heat embossing a splatter from Tim Holtz (a Halloween set) on a black square and attached a portion of one of the folded cards over the splatter. After backing a second piece with black card stock to add some weight, I heat-embossed it with a white sentiment and tied on some metallic threads. I matted the black square with some gold card stock and glued it to a white square card base. The final step was to add the piece of village with the sentiment by using some dimensional foam and some white and gold Tim Holtz stars.

The hardest part about this card was photographing it! I was getting so much reflection that I couldn't get an image that showed the layered village. Bummer, because it is quite effective. 

CONTINUING WITH BLACK, WHITE, AND GOLD...

I wanted to continue playing with black, white, and gold and chose to participate with the current Just Us Girls CAS challenge "In a Circle" and Less is More - "D is for Deck the Halls". I chose to go with a square format, featuring a cut-out ornament image where you can see to the inside of the card, which is lined with a folded vellum panel.


I started with a square top-folded black card base out of which I die cut a circle. The ornament is die cut from gold card stock with a Hero Arts Lia Griffith die/stamp set and heat embossed with Stampendous "Pearl Lustre Peridot" embossing powder. I die cut two of the ornaments and stacked them for a bit more thickness and glued them over the slightly smaller circle cut into the front panel. I then cut it a third time in black and glued that to the back with just a bit of the image offset to add a slight outline. Then I lined the interior of the card with a white pearlized moiré vellum and tied on a gold ribbon and star charm. The final step was to add some of Tim Holtz's stars to the face from the same white vellum.

I might have pushed the CAS requirements a bit with the multiple layers and embellishments, but once I started, it was hard not to add just one more thing!


This card is being shared at Just Us Girls:


and Less is More:


Sunday, November 26, 2023

NOEL

This morning I see that AAA Card Challenge features a CAS card in black, white, and gold. I'm all over that! You may see some additional black, white, and gold cards here in the next day or two - I'm on a roll!


There's not much to say about creating this card: 

  • Top-folded black A2 card base
  • Black cardstock die-cut to a smaller stitched rectangle heat embossed with white embossing powder, using Alexandra Renke "Accentuation - Area" splatter.
  • Gold heat-embossed sentiment (very old from my stash, but never used).
  • Die-cut Alexandra Renke houses and trees from "Winter Village".
  • Three white stars from Tim Holtz's "Forest Shadows" die set. 
  • Custom black envelope with gold vellum lining.
That's it - easy-peasy!

AAA Cards: AAA Card Challenge #254: Black, White and Gold


Added December 17, 2023:


PAPER PLAYERS SKETCH

We woke this morning to a beautifully clear sky and frost - it got down to 24 degrees last night. It's Sunday and seemed appropriate to do a frosty blue and white Christmas card for this week's The Paper Players. This week is a sketch challenge hosted by the beautiful and talented Ann!

The Paper Players: PP668 - A Sketch Challenge from Ann


I wasn't sure how I wanted to approach this design, but decided to use a rectangular die array of  stars from Tim Holtz "Snowy Stars" #663117. I had to die cut it from both ends diagonally to get it to reach from one corner to the next.


Once I had the stars cut out of a piece of blue iridescent card stock, I die cut the panel into a stitched rectangle, matted it with silver card stock, and mounted both panels to a white card base. Next I heat embossed the Impression Obsession sentiment onto a piece of white card stock and heat embossed it with silver powder. After trimming that out with a small stitched rectangular die, I mounted it to the blue panel and popped on a silver PTI snowflake with some dimensional foam.  It seemed to need some additional embellishment, so I glued on a thin white and silver knotted scrap of ribbon.

The shiny silver and blue iridescence of this card don't really come out particularly well in the above photo, but this shot gives a bit more of a sense of what it looks like in person:


 As usual, our design team has come up with some great ideas to spark your imagination! Head over to each of their blogs and see for yourselves. Hopefully now that Thanksgiving is over you'll feel like getting into your holiday card stashes and taking Ann's sketch for a ride. 

News from Stately Wing Manor: Thought I would use this intro instead of "On a personal note". We joke about our very modest 1956 ranch-style house and refer to it often as "Stately Wing Manor" (for those of you who are not Batman fans, Bruce Wayne's castle was always referred to as "Stately Wayne Manor").  

I've been concerned about our poor little ferals making it through these cold nights. We have a covered patio area attached to the house where we have been feeding the kitties. We are feeding 10 and, as some of you would already know, we have been trapping and spaying and neutering cats for a year. Six of the ten are now spayed and neutered and I have appointments mid-December to catch the final four. I got four smallish cardboard boxes, cut 6" diameter holes in the sides and lined the bottom with thick foam core to hold back some of the cold from the concrete floor of the patio. I made up sleeping mats with two layers of heavy shaggy fleece, inner-lined with heat-reflective lining, and put them into the boxes. Well, those little farts pulled all of the pads out of the boxes and spread them around the patio and side yard. I put them back in the boxes and they kept taking them out. I finally gave up and put the pads on some of the seating cushions in the patio and they're happy with this arrangement. I also threw a soft fleece over the sofa and a couple of the siblings share that area to sleep on. We'll see how they do as the temps drop more. They're all growing their winter coats so I think they'll be fine. As it gets colder they may change their minds about going into the boxes - maybe I'll sprinkle some catnip to encourage them. But for the time being they're happy sleeping on the chairs and sofa.  

Thursday, November 23, 2023

GREETINGS & HAPPY THANKSGIVING!

It's Thanksgiving Day here in the US and before I have to get my rear in gear and start preparing my portion of today's feast, I thought to take a couple of hours and add a holiday card. I was inspired by the current challenge over at CAS Colours & Sketches Challenge #526. This week they are challenging us with a sketch and I wanted to do a predominantly white card for this one:


My idea was to do a snowy scene broken into three equal parts. I started by blind embossing a panel of white cardstock with a Darice snowy embossing folder and then die-cutting it into three stitched rectangles. I then overlaid some white birch tree die cuts from Impression Obsession ("Birch Trees" #DIE079-U) and trimmed them to fit within the small rectangles. I mounted them to the face of a white card base and white heat embossed the sentiment on a strip of printed paper and mounted that over the rectangles. The final element is a little red cardinal from the same IO die set (I really wish we had cardinals here in Oregon). Done!

Here's the link to the challenge:

CAS Colours & Sketches: Challenge #526 - Sketch (cascoloursandsketches.blogspot.com)


Added December 9, 2023:


I'm also sharing this card over at Time Out Challenges Winter/Holiday - the fact that this challenge is sponsored by Birch Press seems appropriate!


Added December 14, 2023:


Wishing all of my American friends the very best
Thanksgiving ever!


On a personal note: Having wished all of my American friends a Happy Thanksgiving, I'm going to take a little bit of space here to complain about the crass commercialism surrounding this holiday in this country.  The market-driven Christmas season completely eclipses our day of thanks by imposing Black Friday sales tomorrow and into the rest of the weekend.  And Black Friday (which apparently is the real holiday) has been sliding earlier and earlier into the weeks before Thanksgiving. Maybe I would feel differently if I was a retailer. Am I sounding like an old fart? 

Tuesday, November 21, 2023

WINTER BIRTHDAY CARD

One of my cousins will be celebrating her birthday next month. I think it would be a bit of a bummer to have a birthday close to Christmas - the personal celebration gets over-shadowed by the holidays. So, I always make sure I send her a birthday card separate from her Christmas card (two of my husband's nephews have their birthdays the day after Christmas and they've always complained about it).


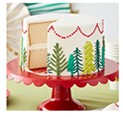
I started this card inspired by the current Just Us Girls Mood Board #706, specifically the layer cake in the center of the board:


What a perfect image for my Simon Says "Fancy Cake Set #S731"! I "baked" the cake and decorated it and went on a search through my Christmas stash for some paper scraps to use as background. I don't know whose paper this is, since I had only scraps left from about 10 years ago - maybe longer. I eked out a couple of stitched rectangles for the front and inside and matted both of them in the same red cardstock as the cake stand. The cake pieces were cut from a textured vinyl wallcovering sample I had on-hand from one of my interior projects. The tiny trees are from Alexandra Renke's "Winter Village". The tag is a PTI "Tiny Tag", which I tied with a triple wrap of red and white baker's twine before attaching the panel to the face of a white card base. I added a bit of dimensional foam behind the cake to hold it out a bit from the busy background, and slipped gold sequins and gems onto the tips of the candles.


Inside I heat embossed a sentiment from PTI's "Winter Hills" over the printed images.
While working on this I noticed that Inkspirational Challenge #303 is a word prompt this week - "Seasonal". I think my card is also appropriate for their challenge.


Added November 24, 2023


Sunday, November 19, 2023

WINTER WISHES

A quick card this morning , inspired by Color Throwdown #769 - Pink/Grey/Green. I started with a white card base and added a white die-cut stitched rectangular panel. 

After die-cutting a second smaller rectangle from warm gray cardstock and matting it in pink, I attached a slightly smaller piece of old printed Christmas paper from my stash and added several additional  die-cut layers - gray stitched waves, green trees from Tim Holtz's "Forest Shadows" and pink houses from Nellie Snellen. Prior to adding the final panel with a bit of dimensional foam, I white heat embossed a favorite old sentiment.   

Color Throwdown: Color Throwdown Challenge #769


TAG, YOU'RE IT!

It's Sunday, - and tag you're it! It's The Paper Players challenge and LeAnne has a brand-new challenge for us. And, wouldn't you know, I didn't focus on it being CAS until I started to upload this image to my blog. Many of my inspirational cards are CAS, so do you think LeAnne will forgive me this transgression? 

https://thepaperplayers.blogspot.com/2023/11/pp667-clean-and-simple-challenge-from.html


I had decided to use LeAnne's challenge to make an actual gift tag for my 14-year-old granddaughter to use for a gift card from her favorite clothing store. She's quite the fashionista and will appreciate this.


I started with a small recycled Hallmark gift bag that had mint green ties on it. I cut off the mint green ribbon and replaced it with a red one, inserted some black and white polka dot tissue,  and attached the tag. For the tag, I used a PTI tag die that I cut twice - once in black and the second time in red shimmer paper. The silver foil wreath is an Avery Elle #D-06-07 "Star Frame Die" and the poinsettia is from Spellbinders (#S4-1135 "Christmas Blooms"). The sentiment is an old one I've had around for years - I heat embossed it with white embossing powder. 

It's now your turn and I trust that you'll follow instructions to make your project CAS! Check out the blogs of each of the Design Team members for their beautiful inspirational entries.

Wednesday, November 15, 2023

WHEN LIFE GETS SCARY...

It's once again mid-month at Two Old Bats Halloween Challenge and here's our current mood board. If you follow the link, you'll see what the Design Team is sharing with you.


This time around I chose the bottom left quadrant for my inspiration:


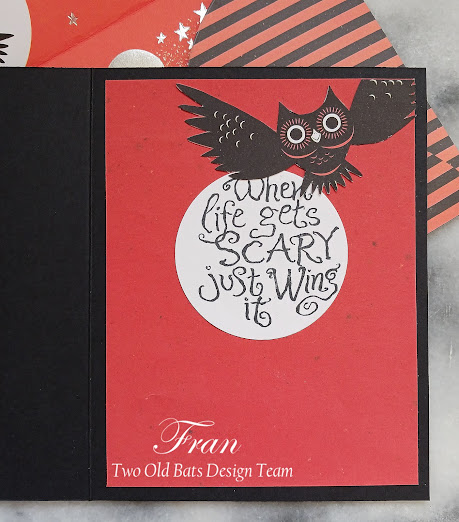
I'm still working with the Park Lane "Boo" printed paper pad I purchased earlier in the year. This paper is printed on both sides, and I love that I can make coordinating envelopes that I don't have to line (not that I ever HAVE to line envelopes, it's just a personal preference). This pattern also has silver foil stars and crescent moons. The pattern repeats diagonally across the page, so to get a single moon and owl near the center of a 4" x 5-1/4" rectangle, I had to pretty much take a piece out of the middle of the 12x12 sheet. But that didn't quite make it, so I patched the bottom right-hand corner and then covered my patch with a fussy cut second owl that I attached with some dimensional foam. This was a very easy card where the paper does all of the work! Well, not all of the work - I did have to stamp the sentiment.


For the inside, I glued a red-orange panel and stamped and glued a white circle with the sentiment and fussy cut a second owl.


We still have until the end of the month to enter your challenge projects - and you can enter more than once, so let's see what you've got! Let's get those cards to 25 so we can award this great prize!


Sunday, November 12, 2023

THE PAPER PLAYERS COLOR CHALLENGE


It's Sunday, so it must be a new challenge at The Paper Players! The very talented Joanne is this week's hostess, and her colors are "Real Red", "Shaded Spruce", and "Gold" plus any color of your choice. So, gather up your red, green, and gold supplies and join in on the fun! If you came here first, then head over to the blog and see what the creatives on our Design Team have offered up for your inspiration. 


This must mean Christmas! My take on this week's colors started with an old Stampendous rubber stamp #CRSS038 that was part of a set that also included a pair of cardinals sitting on a similar branch. My level of ambition this weekend did not include coloring a very complex image of cardinals, so I decided on the separate branch. Is this supposed to be holly? If it is, it doesn't look like the holly growing here in Oregon. But then, we also don't have cardinals here, much to my disappointment!


I stamped the image twice with PTI "Pinefeather" ink on white card stock. The top panel got colored with Copic markers and then a circle die cut from it, so the second panel would show up un-colored, over-stamped, and heat embossed with gold embossing powder. Both images were layered onto a white card base with some gold matting and dimensional foam. The final layer was to add a bit of gold thread and three gold sequins.


And here's what happened with the die cut circle from the front of the card: