Thursday, August 15, 2024

AUGUST TOB MID-MONTH REMINDER

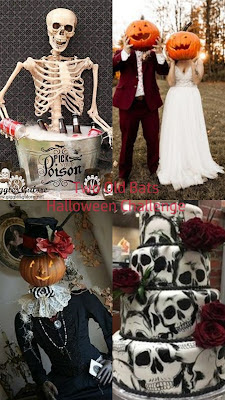
Mid-August and time for the reminder that we are half-way through our current Two Old Bats Halloween Challenge. If you aren't already working on your Halloween project, there's still plenty of time.  


For my entry, I once again selected the lower left turquoise quadrant as my inspiration - I love this color, although it's a bit unexpected on a Halloween card. 

I die cut an old circular graveyard die (don't remember whose die this is) with black cardstock and laid it over a turquoise circle that I had stamped Hero Arts clouds onto and blended white ink along the edges. Then this circle was matted with a larger white circle and glued to a black top-folded card base that I had white heat-embossed with a sentiment from Impression Obsession #CL553 "Is the Moon Out Tonight?" The white border around the sentiment was added with a white gel pen. Finally, I attached one of Tim Holtz's ghosts die cut from white cardstock. The coordinated envelope was custom-made from some of my favorite two-sided printed card stock.

Here's the link to our challenge:


There's so much to be inspired by with this month's challenge mood board. But remember that you can enter anything Halloween!

We've had a good turnout this month, so it looks like the ladies will be able to have a drawing for those great gifts - watch this space!
 

Sunday, August 4, 2024

'S' IS FOR SUMMER

WOW, two days in a row with new cards to share! Today I'm inspired by the ladies over at the Sisterhood of Snarky Stampers. A lot of the challenges are featuring summer and summer travel right now, but I'll just stay with the snarky ladies because I'm not sure the other challenges would appreciate my sailor's mouth on the inside of my card!


I was thinking about a couple of years ago when three other lady friends and I went off to a week in Kauai, leaving our spouses behind. I would have loved to have this card at that time to send to my husband back home holding down the fort.


I used a new sun stamp I found in a sale when I went searching for tropical images for the cards from yesterday. I masked off a horizontal line on a piece of white cardstock and stamped the image (Hero Arts #H6356 "From the Vault Etched Serene Sun") with PTI "Orange Zest" ink and colored the image with yellow and orange Copic markers. The next step was to create the water with Hero Arts #CM316 layers, using several gray and blue tones. Then I went over the waves with a bit of blended yellow and a bit more blue and blended a sky. I over-stamped the sentiment with some dark gray and glued my creation to the face of a top-folded square card base. I die cut a frame from the same card stock and attached it over the image with dimensional foam.

Inside, I generated the sentiment on my computer, die cut it with a square die, blended a bit of blue for sky, and added birds from the same stamp set as the waves. I double-matted the square with a bit of lighter orange scrap and white cardstock and attached it to the inside. Finally, I fussy cut a couple of empty Adirondack chairs and glued them to the inside.  

So, here's where this card is headed:

  Sisterhood of Snarky Stampers: SoSS #253 - S is for Summer


Saturday, August 3, 2024

TROPICAL THANK YOU

It's been a while since I made a card that isn't a Halloween one! 

The organization that I volunteer for regularly had its annual luau last week and I agreed to make some thank you cards for the groups that performed for us - a hula dance group, Samoan dancers, and a Hawaiian ukulele player. The entertainment was terrific! I had absolutely nothing in my stash that was remotely tropical or Hawaiian so I had to hit a sale at my local crafts store to come up with appropriate images. 


I started with this lovely American Crafts printed paper ("Tropical Garden") that I die cut with a stitched rectangular die and attached to the face of a top-folded white A2 card base. Then I die cut a Hero Arts #D1649 "Leaves & Vines Fancy Die" from the same white card stock and attached it over the face of the printed paper. The sentiment was white heat-embossed on a turquoise scrap and die cut with a stitched tag and tied with orange raffia. I glued the tag to the face and fussy cut and layered on an orange hibiscus blossom from the printed paper. I'm pleased with the outcome.

I think there are a couple of different places I can share my project:

All of the above is using completely new-to-me and never before used, so I'm sending it over to the NBUS Challenge #65 for August.


And since I used some pretty printed paper, I'll add this to Diane and Darlene's new challenge blog:


Thursday, August 1, 2024

AUGUST TWO OLD BATS HALLOWEEN CHALLENGE

Well, it's August and we have a brand new challenge at Two Old Bats Halloween ChallengeI know I say this every month at this time, but how did it get to be August? The ladies have a great inspiration board for us, but you can do anything Halloween if the board doesn't inspire you. Generally I stick with something on the board, and this time is no different - I love the turquoise colors of the lower left quadrant and the upper left quadrant with the skeleton sitting on a pumpkin. The only thing missing here is a cat, unless you count the two that tried to photobomb while I was shooting my pics! 

Two Old Bats Halloween Challenge: August 2024 Anything Goes Halloween


I started this card with a side-folding black A7 card base. On a turquoise spider damask printed paper I stamped and black heat-embossed the tail of an Inkadinkado witch to make it look like steam coming out of the die-cut pumpkin cup, adding a black sentiment. I also heat- embossed the swirl with white and orange on the same background paper and fussy cut stars, pumpkins, and skulls from it to paste over the black swirl. The skeleton is one of my favorite often-used images, stamped with black on white, fussy-cut, and tucked behind the cup.

I added a couple of Whimsey Stamps bats and black twine. Finally I added some candies, fussy-cut from the printed paper I used for the coordinating envelope.


Last month's challenge entries didn't get quite up to 25, so we still have these great goodies for a drawing:


Monday, July 15, 2024

JULY MID-MONTH TWO OLD BATS HALLOWEEN CHALLENGE

Mid-July and we're still looking for your Halloween Anything Goes projects here at Two Old Bats Halloween Challenge - you still have two weeks left to play with us! This month's mood board features a couple of ideas using red, white and blue but you're not bound by that as long as your card is Halloween-related. I chose to be inspired by the witch hats in the lower right quadrant.   


This was started with a top-folded A6 white card base. The sentiment is from Unity Stamps with the witch cut off. I stamped the sentiment with black ink, die cut it with a deckle edge rectangle and matted that with black and white printed paper. The opposite side of that paper features the witch hats and I fussy cut one, glued it to the face of the card, and added some bat trim on the hat band. I finished with a coordinating custom envelope - very easy.


Remember that we have a couple of special gifts for a drawing if we get 25 or more entries!


AND


Here's the link and our mood board:


Thursday, July 11, 2024

SEIZE THE BIRTHDAY!

Today I'm popping in as Surprise Party Guest at Seize the Birthday. This is the first time I've had the honor of participating in that capacity at this challenge - one of my favorites! The current optional theme is "Fruits".

                                        Seize the Birthday: Seize the Birthday #287- Fruits


It's times like these that I discover the real "holes" in my supplies. Fruits seem to be something I don't navigate toward when purchasing new products. So I headed off to my favorite craft store in search of something featuring some sort of fruit. With all of the fancy papers, stamps, dies, and other crafts available at their large inventory, I could only find two stamp sets - one featuring cherries and one featuring strawberries, and no fruit patterned papers. I settled on "Simple Vintage Berry Fields" #20120 from Simple Stories.


Once I had my choice of fruit stamp sets, I won't pretend I didn't struggle with this card! It took me hours to work out a design, and then I just ended up using only two of the stamp images and none of the sentiments (but now I have some more berry/Mason jar images to use in the future). Well, that's how it goes sometimes - I'm sure that much of my struggle was related to performance anxiety and having to come up with something that was worthy of the challenge at Seize the Birthday!

I started with a Strathmore A7 card base and matching envelope. I stamped the strawberries each twice - once with red on white card stock and once dark green on green card stock. Then I blended with red ink and Copic markers, fussy cut the berries and stems and glued them together. So, once that was done, what to do with them? After several attempts to come up with a way to use them, I finally decided the more CAS the better, and opted for layering them with an old filigree boarder die (probably Hero Arts) and die cut it from some old green and white printed paper from my stash. I stamped the sentiment from PTI's "Tea for Two Addition" in their "Pinefeather" ink. I dug through the supplies to find some red and pink printed papers and settled on two very small scraps of PTI paper and had to piece the stripes together to make a wide enough piece to stretch the full length of the bottom of the card. Whew! I layered everything together with some dimensional foam and added some pink sequins.
  

After all of the struggle, I'm happy with the final product. My experience is that the more cards one produces, the more easily the ideas flow. That should be a lesson to me not to cut back my production as much as I have this year!

On a personal note: As I write this on Monday, the entire west coast of this country is hotter than hell this week. There are something like 17 wild fires in California and we sit just 30 miles from the California border. It was 111 here in Medford yesterday and the day before and expecting the same for the next couple of days. We've been getting out early to water veggies that I have in pots - and there's our little community of feral cats that are all struggling with the heat, sleeping most of the day. We're replenishing the water a couple of times a day, and last night the raccoons dropped by to help themselves. I think they're picking up dropped small plums from our flowering plum tree and rinsing them in the water before eating. The water was almost mud on the last filling about 10:00 last night!   

Monday, July 1, 2024

JULY TWO OLD BATS HALLOWEEN CHALLENGE

We're back with a brand new Halloween challenge for July! While you can submit anything Halloween, why not use our new mood board as a fun jumping-off place?


I think my submission this month is a bit obscure, giving new meaning to "jumping-off". Looking at the top left quadrant, I was taken by the creepy sign post and remembered a Tim Holtz rubber stamp that I had never used, with a vulture sitting on a sign post. It was quite a small image, so I constructed a scene combining a bunch of small images. 

The moon, bats, and sign post are all Tim Holtz from various Halloween sets and the gnarly tree was a really old image from my stash that I've used several times over the years. I started this card with a gray top-folded 5-1/2" square card base. I stamped a cobweb background on a piece of white card stock, cut it down to 5" square, and attached it to the face of the card. Then, using a 4" square piece of gray card stock, I stamped the moon with Hero Arts "Unicorn" pigment ink. When that dried I over-stamped the trio of bats and the tree. To get the sense of grass across the lower part of the card, I used a Whimsey Stamps grass stamp from their "Zombie Party" set. I stamped the vulture/sign post with black ink on white card stock and fussy cut it out, attaching it to the face of the card with some black dimensional foam. The next step was to white heat emboss the sentiment on a strip of black card stock that had been cut with a stitched curve die and attach it to the bottom of the square with dimensional foam. And because I have this "thing" for ties and simple embellishments, I punched a hole in the top right and pulled some black and white baker's twine through it. After adding a black mat, all was attached to the face of the card.


The custom envelope was made from some two-sided printed paper from Park Lane's "Haunted Hollow" pad. It seemed that paper with creepy animal skeletons would work okay with my card.  

By now, if you send out July 4th cards (I'm not this year) they're probably all finished and in the mail. So, time to start thinking about Halloween! Get out your supplies and join us Wacky Old Halloween Bats with a card of your choice. Remember that if we get 25 or more entries we have a special drawing!


AND


Friday, June 28, 2024

GETTING MY SNARK ON!

I've been contemplating the latest Sisterhood of Snarky Stampers #251 - "D is for Die Cuts". Today I have some time on my hands, so I headed into the craft room for further contemplation. The idea I decided to pursue was to make a really pretty card and contrast it with a snarky sentiment. How do you think I did?


I used one of my favorite techniques, which I guess is called "spotlighting", starting with a 5-1/2" square top-folded white card base. Using a floral stamp from Hero Arts + Gina K (#PR101), I stamped it on the face of the card base with PTI "Soft Stone" ink, plus 2 more times on additional card stock squares. I won't go into all of the technicalities - just suffice it to say it took a bit of engineering to get all of the layers die cut with the selected square dies and trimmed to fit the card base in graduating layers. I colored the roses on the original card front with my Copic markers and over-stamped the Unity Stamp "Itty Bitty" #IB-948 and heat embossed it with silver powder. Before assembling the card I silver-embossed the outer edges of the second layer and die cut a small row of stitching holes on the colored area to pull some silver threads through.  


The final step was to assemble all of the layers and glue them to the front of the card and attaching a small die cut heart over the stitching. This photo gives a better look at the metallic silver elements:


So here's a link to Edna's invitation to join her with your creative die cutting project: 

Sisterhood of Snarky Stampers: SoSS #251 - D is for Die Cut


On a personal note: Sometimes to amuse myself, I check the Urban Dictionary for their definitions. I looked up "snark" today and came up with this - "A smart ass remark made by wanna be hipsters who think they cloak their douchebaggery in a self important sense of fey cleverness and ironic witticism." OUCH!! 

Sunday, June 23, 2024

DOUBLE STENCILING TECHNIQUE

Happy Sunday, all! At the current Seize the Birthday Challenge, the designers are featuring an interesting stencil technique that I thought to try my hand at - Double Stenciling. They have a link to a how-to video and it's really a fun thing that I think I'll try again soon.

I began this experiment with some pale pink smooth cardstock and, using yellow ink and blending brushes, I stenciled circles. Then I overlaid an overall squares stencil and brushed on pink. I trimmed the panel down with a stitched rectangular die and matted it with mustard and charcoal cardstock. My disappointment with this card is that when I over-stamped the sentiment with charcoal ink, it really faded as it dried. I should have left it in my Misti and re-stamped it after it dried or added some clear embossing powder to deepen the color. The Impression Obsession Hollyhocks are my absolute favorite flower dies - I've used them over and over and never get tired of them. In this case, I die cut them in charcoal and coral and glued just the coral blossoms onto the charcoal bases. I also tucked in a floral stock in charcoal from Tim Holtz. 

Seize the Birthday: Seize the Birthday #285-Double Stenciling


Added June 28, 2024:


On a personal note: With school ending and all of the end-of-the-school-year activities for my husband through the month of June, I just haven't been making cards much, so it was fun to get back into crafting today. In addition to the busy social activities, I've been doing some heavy-duty gardening and our front yard is now finished! It looks a bit sparse at the moment with all new small plants, but by this time next year it should be a proper native pollinator garden.

I'll end by sharing a photo of our grand-twins at their Moving-up Ceremony last Friday evening - I can't believe that they are now high schoolers. It's Alexis, Colin, and their younger sister Kaitlyn. I thought this was a great picture of them! In September they'll be 15 and in October Kaitlyn will be 10.


Saturday, June 15, 2024

PICK YOUR POISON!

Mid-June already and time for a new inspiration card for Two Old Bats Anything Halloween Challenge! I finally gave up on trying to make anything wedding-related and decided on the idea of "Pick Your Poison" from the top-left quadrant of our mood board.

Two Old Bats Halloween Challenge: June 2024 Mid Month Reminder


I used Tim Holtz's "Happy Hour" dies as a jumping off point and die cut the glasses from vellum.

I prepared a black 5-1/2" square card base and attached a couple of square patterned scraps I had in my stash for a background for my creepy cocktails. The sentiment was generated on my computer and trimmed to fit the width of the purple square. I selected three coordinating purple, orange, and green pieces for the drinks and fussy cut various creatures and items from some coordinating DCWV "Boo Crew" printed papers. I love these papers! You can see from the coordinating envelope paper where the bat and spider come from. The ghost coming up from the martini glass is a Trinity Stamps die that was new to me this past Halloween.

This was fun to make! I'm hoping you'll get out your Halloween supplies and play along with us this month. If we get 25 or more entries, this fun die will be randomly chosen to send to one of the entrants:


Thursday, June 13, 2024

ANOTHER FAMILY BIRTHDAY

And today is my daughter-in-law's birthday! Anyone who follows me knows I haven't been very active here lately. It just seems like there's always something else to do. For me, the more active I am, the quicker the ideas come - so to step in to make a new card required a swift kick in the butt by way of a challenge. The current Tic Tac Toe Challenge #249 provided the necessary incentive. I used the first column down - Layers/Die Cut/Patterned Paper.

I think this definitely ticks off the boxes - many layers, a die cut gift card envelope and leaves, and patterned paper. I started with a white 5-1/2" square top-folded card base and attached an embossed 5"square that was matted with a 5-1/4" square of the same paper. Then, using the same white card stock, I die cut a white gift envelope and lined it with black and white printed floral paper and attached that to the front of the card. I die cut some PTI leaves from black and white dotted paper and tucked them into the envelope, along with some fussy cut flowers from the same patterned paper as the envelope liner. Rummaging through my envelope stash, I found a bright pink square envelope and decided to use it and felt I needed a bit of pink on the card to match. I white heat embossed the sentiment and die cut it into a tag. The final step was to pull some twine through the tag and attach it to the gift envelope, overlapping a couple of fussy cut flowers from the patterned paper. I also ended up lining the pink envelope with the black and white patterned paper. 


TTTC249 - Featured Designer Jeanie - Tic Tac Toe Challenge


Added June 22, 2024:


Tuesday, June 4, 2024

SPECIAL BIRTHDAY CARD

June 4th and a date I'm not likely to ever forget - my son was born on this date at 6:00 AM in Redondo Beach, California 50 years ago! He started out thinking he would celebrate tonight at one of his restaurants that is closed on Tuesdays, but as the date got closer he got less and less excited about it. Last week he announced to us that he really didn't want to make a big deal out of this and thought to wait until next Sunday when his mother-in-law has bought tickets for the whole family to go on a jet boat ride and dinner down the Rogue River. His wife said she wanted to invite friends over to their house tonight, but he was afraid that he would have to cook (he does all of the cooking in their house - Dani can barely boil water). So we offered to host and cook, and still not much enthusiasm. Finally, Dani decided this was too important a birthday to just ignore, so she took matters into her own hands and is ordering food in for a party with all of their friends.

I struggled a bit trying to come up with a decent 50th birthday card but finally settled on highlighting his lack of enthusiasm:


If this looks familiar to any of my followers, then you're right - I cheated and tore apart a previous card to build this one. I took all of the Tim Holtz people off of this card and replaced them on a new black cardstock accordion-folded card base. The sentiment that I generated on my computer seemed very appropriate!

I made this custom envelope, and here is the complete presentation as he will open it:


That's it! We went in on a new propane grill as a gift from the entire family, and are planning to take it over this evening and tell him that we're expecting him to grill for everyone. Thankfully, he has a great sense of humor!

Saturday, June 1, 2024

JUNE TWO OLD BATS HALLOWEEN CHALLENGE

9:00 PM on June 1st here on the west coast and it's time for a new Two Old Bats mood board! It being June, this mood board features wedding imagery. I started out working on baking a wedding cake, but it flopped seriously, so I went with some skeleton imagery. I'll try again at mid-month and see if I have any more luck. 


As one of my lovely Design Team members has said, there's something to be said about making the paper work for you on a card! This Trick-or-Treat image has been in my stash for a very long time. I trimmed it down with a stitched rectangular die and matted it with a pale gold cardstock to pick up the tones from the fussy cut moth that was on one of the Park Lane "Haunted Hollow" papers. I love the skull image on his back! Before attaching it to the card with dimensional foam, I stamped the sentiment with Hero Arts "Unicorn" pigment ink. When it dried I over-stamped with Hero Arts "Butter Bar" ink. I was disappointed that when it dried it was not as intensely gold-toned as before drying. I'm thinking it would have benefitted with a couple more coats of the Butter Bar after drying. I'll try this overprint technique again sometime soon to see if I can get the colors a bit more intense.


The envelope was a plain black one from my stash and I lined it with a skeleton paper from American Crafts "Happy Halloween".

We would love to have you join us this month in our challenge! We're still trying to give away this really cute "Spooky Tree" die from Tutti Designs, and if we get more than 25 entries you could be a winner!